Tuesday, December 27, 2022

Data Privacy & Data Security In Today's Digital Age


How to Become as "Invisible" as Possible In Today's Cyberage

I have been getting a lot more questions from customers lately with regard to online data privacy and data security.
"How can I keep my online accounts more secure?"
"I would like to surf the internet as anonymously and as privately as possible. How can I do that?
"I found some personal information online, and would like it removed! How do I do that?"

So I decided to write a post covering the basics of online privacy, how to improve your safety and security when online, and how to get personal data removed from the internet (if at all possible).

Limiting Personal Data From Getting Online & How To Use The Internet More Securely/Privately:

  1. Delete all social media accounts, take-down any/all personal/professional sites (blogs, websites, etc), and delete or depersonalize any/all types of online accounts. These sites have been used for years for obtaining personal information, gathering information for social engineering attacks, and even identity theft! 
    • Facebook
    • Twitter
    • LinkedIn
    • Forum Accounts
    • Other Online Accounts (ie) News Sites, Game Sites, Online Stores, etc.
  2. Remove all (or disable) unnecessary apps from your Smartphone, Tablets, eReaders, etc. 
    • Do not install apps that collect any type of personal data, or unnecessarily require you to create an account just to be able to use the app. Also, downloading and installing "THIS AWESOME FREE APP" is the #1 way for a company to easily collect data about you.
  3. Search for any personal information listed on "Data Broker" websites and submit a request for your information to be removed. 
  4. Use a VPN for any and all web surfing; preferably a no-logging VPN like Private Internet Access.
  5. Use a web browser that has your privacy in mind from the get-go. A very popular privacy-oriented web browser that is widely used is the Brave Browser. By default, the Brave Browser blocks website trackers and advertisements. It also has an incognito mode for even further private surfing, private search features, and even some VPN connection features. It's a great program for privacy conscience users.
  6. You can take things a step further and use the Tor Browser and the Tor Network to access and surf the internet. When using the Tor network, you are using a decentralized network that routes traffic through multiple servers (or "nodes") and encrypts the transmitted data each step of the way. It's quite secure and great for anonymity! Sounds amazing, right? Why isn't everyone using it? Well, it can sometimes be a bit difficult to get set up and connected to the Tor Network, and the speed of the network can be quite slow. But if security and privacy are your goals, Tor is the go-to for anonymous, encrypted internet use. This also makes it popular among nefarious people...
  7. To take things even a step further, you can use a USB Thumb Drive-based Linux operating system for privacy-oriented system usage and web/internet usage. Though you would still likely want to use a VPN as well as a secured web browser. But this is a great option to have a "temporary" bubble to use. Tails is a portable Linux OS that is my go-to if I need to use a system that is foreign to me, but I need to securely access online data or securely log in to online accounts. All without leaving a trace behind on the host system! It technically could also be used as a day-to-day OS for those wanting even further their security/privacy.
  8. If you are worried about using public Wifi, the easiest option is to get a Mobile Hotspot plan through your cellphone provider. Most cell phones are capable of creating their own Mobile Hotspot that other devices can then connect to. If that is not an option with your cellphone, then getting a physical Mobile Hotspot from your cellphone provider would be the next best thing. Speeds may not be great! But you will be using your own personal/private network when out on the go.
  9. Create a "generic" email account that has very little personal information associated with it, or even go as far as to use a fake name! If what you are sending via email is secure/critical, you can use an encrypted email service such as ProntoMail. There are also "Burner" email services that are temporary! You could create and use a somewhat personalized email for a job interview or something more official, but it would just not be permanent. I believe that ProntoMail premium is capable of providing this feature at a cost. But there are some free-ish services such as Temp-Mail and GuerrillaMail that you can use as well.
  10. Use an encrypted text messaging/messaging service such as Signal or WhatsApp
  11. Use virtual/burner credit cards for online orders. That way, your actual credit card information can't be intercepted or stolen! Privacy.com is a great example of a free/paid-for provider of this type of product/service.

Remove Personal Data From the Web

  • Data Removal Request: If you live in a state that has a "Digital Privacy Act" that requires companies to remove personal data if requested to do so, then search for any and all personal information and keep track of where it is all listed. Then reach out to those companies/services directly, and ask them to have your personal information removed or for you to be "opped out". If they do not follow through with your request, and your state DOES have a "Digital Privacy Act" or Law in place, then you can contact the FTC and/or your State Attorney General's office to report that company/service.
    Here’s a List of Data Broker Sites and How to Opt-Out of Them
  • OneRep -As cheap as $9 a month, OneRep is an automated removal service that covers over 150 data broker sites for your provided personal data.
  • DeleteMe - This service is a little more expensive at $10.75 a month, but is also highly rated for being able to remove personal data. Their system is automated as well, but where they are a "step above" is that they have actual employees that will assist with private data removal. Not all data broker services respond well to automated requests. So this is where DeleteMe stands out above the pack! That extra dollar or two could go a long way...
  • Legal Removal Request - If a removal request has gotten you nowhere, and the FTC and/or your State Attorney General is not able to help. There is legal action you could still take! You would need to find an attorney who is familiar with internet law. A lawyer could try to obtain a court order to remove your private data. That court order could then be presented to the website or a search engine (such as Google) and your data will either be removed from the website, or the URL containing the data will be omitted and blocked from search results.
  • Dark Web data is nearly impossible to have removed. It's the wild west of the internet, and the folks that use the Dark Web for nefarious things simply do whatever they want. Even if you were able to find and contact a dark web site that has your personal data/info, that alone could make you a target for further attacks and exploitation. You can't change your address obviously. But you can change your email, and phone number(s).
  • Government sites are exempt from these data removal requests as some information is public domain/public record.

Securing Your Online Accounts

In this day in age, just having a password is not enough to keep your online accounts secure, and hackers out of your accounts. Even if you do everything in your power to keep your login information secure, data breaches happen to big companies all the time! So even with your due diligence, your data can still be leaked and exposed in a data breach, data/network attack, etc.

But there are a few ways you can fight this!
  1. Use 2-Factor Authentication
  2. Use a USB Security Key
First off, it is HIGHLY recommended that you set up and use 2-Factor Authentication on all online accounts that you can. If you don't know what 2-Factor Authentication (or 2FA) is, you may actually already be familiar with this security technology. You know when you log in to your online banking on a new or different device. The bank will likely give you a call or send a text message with a code to confirm you are who you say you are. That is 2-Factor Authentication! Since 2FA has been around for a while now, calling/texting your phone with a code can be compromised. To take things a step further, you can download and use an Authenticator App on your smartphone, to generate account access codes whenever you may need them!

Both Google and Microsoft have their own Authenticator Apps. Surprisingly enough, Google (as of this post) doesn't let you back up your associated accounts and security keys. You can transfer them, however! But if you lose your phone, break your phone, or get a new phone (and forget to transfer your Authenticator data), you could get locked out of your very own accounts! So I tend to find myself recommending Microsoft's Authenticator App for creating, storing, and accessing 2FA security codes. Microsoft's Authenticator App has a backup feature and you can easily backup, transfer, and restore all of your 2FA account information if needed. This can be a lifesaver...

Now, if you want to take your account security to the NEXT level, you could purchase and use a hardware-based USB security key. A USB security key is a device that works on the same principal functions as 2FA. But instead of getting a phone call or text message with a security code, or having to use an authenticator app. You would physically plug in a USB device to gain access to your associated online accounts! So in order for you, or anyone else, to be able to get into an account that is associated with your USB Security Key. The USB Security Key would be physically plugged into the device needing account access, and then you would have to touch the USB Security Key with one of your fingers for account access to be granted. This would make it nearly impossible for anyone to exploit the phone call/text message codes, try to fake an authenticator app code, etc. The USB Security Key would have to be directly plugged into the device, and then touched for access to be granted to an associated account. Yubikey is the maker of the security keys that I have used personally, and I highly recommend their products! They make different models that have different interface types, including NFC, USB-A, USB-C, and Apple's Lightning connector.

The one downside to using a USB Security Key, however, is that you have to physically have the key with you in order to gain access to your accounts. If you lose your key, or it gets stolen, then whoever has possession of your key will then have access to all of your associated accounts. Yubikey does however allow you to disable a USB Security key in the event that something like that happens, however!
So if you do decide to start using a USB Security key for your online accounts, it's important to keep that key in a safe place, and have an alternative way of accessing accounts in case your key is ever lost, stolen, or damaged.
Some folks (myself included) purchased a second USB Security key that is all set up and ready to go but is kept stored in a safe place, just in case anything happens to the primary USB Security key.
You could also use an Authenticator app in addition to your USB Security key. An authentication app would serve as an alternate way of accessing your accounts if ever needed.

The bottom line is this: If you decide to use a USB Security key for your online accounts, just make sure you keep it stored someplace safe and secure. Also, have alternative/redundant account access in place. That way, if you lose or damage your USB Security key, you can still get into your accounts!

With the implementation of even a few of these tips, you can greatly improve your online privacy and security!

Jon Pienkowski
Owner/Operator
Pacific Northwest Computers
www.linktr.ee/pnwcomputers
360.624.7379

Wednesday, November 2, 2022

Had a Data Breach or Experienced a Computer/Network Hack or Attack?! Here's What To Do!

What To Do If You Have a Data Breach or Experience a Computer/Network Hack or Attack!

Despite your efforts to control access, track assets and create secure procedures for your network, online accounts, and computer systems. Data breaches, Server Attacks, Network Attacks, Account Hi-Jacks, you name it! It can happen, and it does happen. Knowing what to do if you suspect or actually have a problem can make the difference between a minor inconvenience, and a disaster that interrupts your ability to do business! The following steps can help you recover after a breach or hacking incident. The faster you can recover, the sooner you can get back to business!

  1. Stop the Breach/Stop the Attack:
    Isolate any devices or systems that have been identified as being a part of the breach and/or attack. If the hacker has used an email or account to access your systems, close them down to prevent further damage. If a specific computer is infecting other systems on the network, disconnect its network connections and get it offline. Ultimately, the faster you can restrict access to the systems, computers, and or accounts that have been affected, the less damage a hacker can do.

  2. Examine the Damage:
    You’ll need to determine the extent of the damage and which systems,  accounts, or users are suspected of being compromised, and which systems are confirmed secure. When you know what has actually been accessed, and what/who has been attacked, you will be better equipped to deal with the overall situation.

  3. Restore your Systems:
    Once the threat has been addressed, you can restore your systems, network, etc so you can continue your normal day-to-day work. If you have a DRaaS or BaaS system in place, your provider will be able to help you recover any lost, stolen, or deleted data quickly. If you don't have any backup systems in place for your critical data, try to work with your in-house IT team to attempt data recovery, and get things back up and running as fast as possible. If you realize you are in over your head, engage with an IT solutions company like Pacific Northwest Computers to help remedy security issues and implement data protection plans for the future.

  4. Perform an Audit:
    Determine how your systems, online accounts, email accounts, etc were accessed. Go over your response to stopping the breach, and the effect the attack/response had on your business. Once you know the answers to those questions, you can make better decisions on how to move forward and be better prepared for the future.

  5. Learn From Your Mistakes:
    After the initial shock has passed and your system is back on track, work with your IT team and or an outside IT company such as Pacific Northwest Computers, and establish a plan to prevent further issues, as well as set up any further needed "safety nets" to limit downtime, enable a quicker response, and prevent any data loss as well as have a system to get data back as quickly as possible. This will lower your risk of further attack as well as better prepare yourself if another attack was to occur. That alone is worth the peace of mind!

    For example, If your attacker got in via your email or by exploiting a poorly chosen password, retrain employees to better protect your network. If the attacker used a lost or stolen device, you may need to address inventory tracking. If data was stolen, held for ransom, etc. you have a backup plan for all of your important and critical data! Plus much more.

As always, if you need help with anything, just give us a call, send us a text, or send us an email!!

Pacific NW Computers
360.624.7379
503.583.2380
www.pnwcomputers.com
www.linktr.ee/pnwcomputers.com

Thursday, October 20, 2022

Enable Modern Authentication for Office 2013 & Outlook 2013(On PC)

Enable Modern Authentication for Outlook 2013

A common problem that I have been coming across lately is that since Microsoft increased the security for their Office 365 email services back in August 2022, I have been getting a lot of customers whose Outlook 2013 software will consistently ask for (but will not accept) the user's email account password. This problem is due to the fact that even though Office 2013 does support Modern Authentication, it's actually OFF by default!
Well, I finally found Windows registry modification instructions direct from Microsoft that ACTUALLY work! Applying these Registry modifications to your computer will activate Modern Authentication for your Office and Outlook 2013 software!
You will need to make some registry modifications, however... So back up your system's Registry information BEFORE making ANY modifications! 

Proceed at your own risk!

Method #1

Microsoft Office 2013 installed on a Microsoft Windows computer, does support Modern Authentication. But it needs to be enabled; as it is turned off by default! It was a more advanced security feature that was not as widely used at the time. 
To turn on the Modern Authentication feature, you will need to configure the following registry keys:
  1. Open "Registry Editor"
  2. Navigate to the Registry Keys below.
  3. Create a new "DWORD (32bit Value)" for each entry listed below.
  4. After creating each new "DWORD (32bit Value)", double-click the "DWORD" entry you just created and change its "Value" to 1.
HKEY_CURRENT_USER\Software\Microsoft\Exchange\
Key Type: DWORD (32bit Value)
Value Name: AlwaysUseMSOAuthForAutoDiscover
Value: 1

HKEY_CURRENT_USER\Software\Microsoft\Office\15.0\Common\Identity\
Key Type: DWORD (32bit Value)
Value Name: EnableADAL
Value:
 
HKEY_CURRENT_USER\Software\Microsoft\Office\15.0\Common\Identity\
Key Type: DWORD (32bit Value)
Value Name: Version
Value: 1

Method #2

  1. Make sure that Outlook and any other Office software applications are closed.
  2. Open up the "Notepad" application; specifically Notepad! Do not use Word or Wordpad, etc.
  3. Copy and paste the following text into Notepad:

    Windows Registry Editor Version 5.00

    [HKEY_CURRENT_USER\Software\Microsoft\Exchange] "AlwaysUseMSOAuthForAutoDiscover"=dword:00000001

    [HKEY_CURRENT_USER\Software\Microsoft\Office\15.0\Common]
     
    [HKEY_CURRENT_USER\Software\Microsoft\Office\15.0\Common\Identity] "EnableADAL"=dword:00000001
    "Version"=dword:00000001

  4. Save the file with the file extension ".reg" instead of ".txt" in a location that's easy for you to find. For example, C:\Users\%USERNAME%\Desktop\Office2013_Enable_ModernAuth.reg.
  5. Open File Explorer (formerly known as Windows Explorer), browse to the location of the ".reg" file you just saved, and then double-click it.
  6. In the User Account Control dialog that appears next, click Yes to allow the app to make changes to your device.
  7. In the Registry Editor warning dialog that appears next, click Yes to accept the changes.
  8. Next, you will need to sign out of your user account and sign back in for the change to take effect. You may even want to just restart your computer.

That's it! 
The next time you open Outlook, you should get the modern authentication login pop-up where you can enter your email account login information, and your Outlook email should work again!

Pacific Northwest Computers
www.pnwcomputers.com
www.linktr.ee/pnwcomputers
360-624-7379

Friday, October 14, 2022

Recommended PC Apps, Programs, Tools & Utilities! *UPDATED*

A basic list of software tools, and utilities that we use and recommend!
We will update this list as much as possible! 

Tools and Utilities:

  • Hirens All-In-On PE/USB Boot Disk - Great bootable utility with TONS of diagnostic software; password recovery, data recovery, disk & boot loader repairs, various diagnostics, and MORE!
    http://www.hirensbootcd.org/download/
  • BleachBit When your computer is getting full, BleachBit quickly frees disk space. When your information is only your business, BleachBit guards your privacy. With BleachBit you can free cache, delete cookies, clear Internet history, shred temporary files, delete logs, and discard junk you didn't know was there!
    https://www.bleachbit.org/
  • GParted - GParted is a free partition manager that enables you to resize, copy, and move partitions without data loss. Some repair capabilities as well.
    http://gparted.sourceforge.net/download.php
  • Memtest86 - MemTest86 is a free, thorough, stand-alone memory test for x86 architecture computers.
    http://www.memtest86.com/
  • Offline NT Password & Registry Editor - This is a utility to reset the password of any user that has a valid local account on your Windows System.
    http://pogostick.net/~pnh/ntpasswd/
  • HFSExplorer - HFSExplorer is an application that can read Mac-formatted hard disks and disk images. It can read the file systems HFS (Mac OS Standard), HFS+ (Mac OS Extended) and HFSX (Mac OS Extended with case-sensitive file names), including most .dmg disk images created on a Mac, including zlib / bzip2 compressed images and AES-128 encrypted images
    http://www.catacombae.org/hfsx.html 
  • DiskInternals Linux Reader - Access files and folders on Ext, UFS, HFS, ReiserFS, or APFS file systems from in Windows.
    https://www.diskinternals.com/linux-reader/
  • Ext2explore - Ext2Read is an explorer like utility to explore ext2/ext3/ext4 files. It now supports LVM2 and EXT4 extents. It can be used to view and copy files and folders. 
    https://sourceforge.net/projects/ext2read/
  • IsoBuster - IsoBuster is actually a CD/DVD and BD/HD DVD data recovery software that can interpret, open, and extract various CD/DVD/Blu-ray disk image files, including DMG.
    http://www.isobuster.com/download.php
  • WinDirStat - WinDirStat is a disk usage statistics viewer and cleanup tool for various versions of Microsoft Windows.
    https://windirstat.net/
  • CutePDF Writer - CutePDF Writer is the free version of commercial PDF creation software. CutePDF Writer installs itself as a "printer subsystem". This enables virtually any Windows applications (must be able to print) to create professional quality PDF documents - with just a push of a button! ALL FOR FREE!
    http://www.cutepdf.com/products/cutepdf/writer.asp
  • Sumatra PDF Viewer - Sumatra PDF is a slim, free, open-source PDF reader for Windows. Sumatra has a very minimalistic design and is nowhere NEAR the security risk that Adobe Reader can be. Simplicity has a higher priority than a lot of features with Sumatra. It's small, secure, and starts up very fast.
    http://blog.kowalczyk.info/software/sumatrapdf/download-free-pdf-viewer.html
  • Piriform Recuva - Accidentally deleted an important file? Lost something important when your computer crashed? No problem! Recuva recovers files deleted from your Windows computer, Recycle Bin, digital camera card, or MP3 player. And it's free!
    http://www.piriform.com/recuva
  • RStudio Data Recovery (Paid For) - Empowered by the new unique data recovery technologies, R-STUDIO is the most comprehensive data recovery solution for recovery files from NTFS, NTFS5, ReFS, FAT12/16/32, exFAT, HFS/HFS+ and APFS (Macintosh), XFS, Little and Big Endian variants of UFS1/UFS2 (FreeBSD/OpenBSD/NetBSD/Solaris) and Ext2/Ext3/Ext4 FS (Linux) partitions. It also uses raw file recovery (scan for known file types) for heavily damaged or unknown file systems.
    https://www.r-studio.com/
  • CloneZilla - Clonezilla is a partition and disk imaging/cloning program similar to True Image® or Norton Ghost®.
    https://clonezilla.org/
  • Macrium Reflect -  Are you looking for free backup, free cloning, or free disk imaging software? Macrium's Reflect Free is one of the best no-cost solutions on the market.
    https://www.macrium.com/reflectfree
  • Microsoft Windows OS Media Creation Tool(s) - You can use installation media (a USB flash drive or DVD) to install a new copy of Windows, perform a clean installation, or reinstall Windows.
    https://support.microsoft.com/en-us/windows/create-installation-media-for-windows-99a58364-8c02-206f-aa6f-40c3b507420d

Security Software:

What is a rootkit!? A rootkit is a program or a program kit that hides the presence of malware (or itself) in a system. A rootkit for a Windows systems is a program that penetrates into the system and intercepts the system functions; Windows API. It can effectively hide its presence by intercepting and modifying low-level API functions. Moreover it can hide the presence of particular processes, folders, files and registry keys. Some rootkits install their own drivers and services in the system and they also remain “invisible".  

Software Sites:

  • Ninite.com - Great "update-all-at-once" site that lets you install/update multiple programs without dealing with individual installers, prompts, etc. One download, one install; as many programs as you like!


Let me know of any issues with links!

Pacific Northwest Computers
www.pnwcomputers.com
www.linktr.ee/pnwcomputers
360.624.7379

Wednesday, October 12, 2022

Get Cash Back On Spending & Increase Your Credit Score!

Here are a few tips to help put some of your hard-earned money back into your bank account and wallet, and ALSO increase your Credit Scores!

  1. I highly recommend using the website NerdWallet to find good credit cards, banks, loans, retirement plan ideas, etc. I have been using this website for YEARS and is such an excellent resource to better spend AND save your money!

  2. Use cash back store cards for companies like the Amazon Store Card. It's not a full fledge credit card, so you can ONLY use it at that specified retailer. With Amazon specifically, you will get 5% back on all that you spend/buy (this does not apply to financed purchases, however). It's an over-glorified version of the espresso stand punch card. I typically get around $1000 back every year just by funneling payments through store cards like this!

  3. If you drive a lot, go out to eat a lot, etc. Get a credit card that gives you cash back on those purchases. I personally love my Costco Visa card as you get cash back on Gas, Food, Costco Purchases, and a lot more. Another example, I have an American Express card that I use just for my cell phone bill and also gas, because I get 5% cash back on those payments through Amex as well. With Costco, I get around $500 back every year; with Amex about $100.

  4. If you have money saved and just sitting in a regular old bank savings account, think of putting that into a ROTH IRA or a Certified Deposit; or even a high-interest (and thusly high balance) savings account. Something where your money can sit AND earn interest as it just sits; there are other options as well. But the premise is to earn money as your savings just sit. *Roth IRAs are complicated but you can typically remove what you have personally invested without penalty.

  5. People with credit scores in the 800s use less than 5% of their available credit. So if you had a $8,000 credit line, you use only $400 at a time. While people with scores from 701 to 750 have 27% credit utilization. So don't go maxing out your cards!! Responsible purchasing, on-time bill payments, and low credit usage will get your scores up FAST and HIGH!

  6. If you create an account with each of the Major Credit Bureaus, they sometimes have a "spending scanner" available on the user's account page. This "spending scanner" can scan your bank accounts for purchases that can be applied to your credit score! I jumped my score through Experian by 10 points just by using their "purchase history spending scanner"! But, only do this if you feel comfortable letting these companies access and scan your bank accounts... Is a Better Credit Score Worth Exposing Your Bank Data?

  7. Lastly, and MOST importantly, set up weekly automatic bill pay through your bank or through your card account for any/all of the cards that you have set up. That way you don't get hit with a big ol' bill at the end of the month, or accidentally spend more than you have.

These are just a few tricks that I use to better spend and save my money, and I just wanted to share some of what I have learned. Hopefully, it's not a bunch of "I already know that" kind of stuff...
Hopefully, you found at least 1 thing useful from this post  

Feel free to comment/share any other tips and tricks you might have!

Thursday, September 29, 2022

IT Advocacy Services - We Can Be Your Technology Advocate!

What Is an IT Advocate?

An IT advocate is an individual who supports and advises clients with their IT product/service needs, as well as any other technology-related needs. Not everyone has, needs, or can afford a CTO or a dedicated System Administrator to help with, and represent, their business. But now, you can hire Pacific Northwest Computers to represent your company in those roles, if and when that need ever arises! 


The IT Advocating Services that Pacific Northwest Computers Provides, Include:

  • Liaison Responsibilities
  • Investigate, Document & Resolve Product or Service Issues With Vendors/Providers
  • Refer & Consult Clients on Recommended & Needed Technology Products/Services
  • Conflict Resolution & Mediation with Vendors/Suppliers/Etc.
  • Crisis Management & Crisis Prevention/Response
    • Malware Attack Investigation, Documentation & System Improvements
    • Data Breach Investigation, Documentation & System Improvements
    • Data Loss Disaster Assistance, Policy Development & Data Loss Prevention System Development
  • Information Technology Professional Witness for Legal/Court Cases
  • Help Set Up Appointments for Needed Services or Support From Vendors/Providers
  • Warranty Exchange/RMA Support
  • Termination of Service(s) Support (Software Vendors, Services, Etc)
  • General IT/Technical Advising
  • HIPPA Consultation
  • Technical Documentation Services
    • Reading & Understanding Technical Documentation 
    • Reading & Understanding Service/Setup Material & Instructions
    • Implementing Needed Technical Procedures for Products & Services
  • "On-Demand" IT Administrator/CTO Services: 
    • Develop policies and procedures
    • Recommend the use of technology to enhance products and services for a client's internal operations, as well as their customer's experience.

Jon Pienkowski
Pacific Northwest Computers
360.624.7379

Wednesday, September 21, 2022

Xbox Elite and PS4 Controller PC Gaming Issue - Keyboard Keeps Popping Up!

When gaming on a PC with a Xbox, Xbox Elite, or PS4 controller, a virtual keyboard opens when pressing the left stick!


A virtual keyboard that pops up when clicking the left stick on an Xbox controller (or even a Playstation Controller), is specifically related to a Steam App gaming feature called "Big Picture Mode".  Somehow this feature can get triggered outside of Steam if it just happens to be running in the background, and it can affect other controllers/games as well.


Here is how to fix the issue!

  1. Go into "Settings" in the Steam App
  2. Click on "Controller" near the bottom
  3. Next, you want to click on, and open, "Desktop Configuration" settings
  4. When the settings window opens, you will see the left stick has the "Show Keyboard" setting mapped to it
  5. Click where it says "Show Keyboard" in the Left Thumbstick mappings list
  6. At the bottom of the mapping window that opens up, click where it says "Remove"
  7. Then close the "Desktop Configuration" settings window
  8. Close out of settings all together
  9. That should remove the problem permanently for you!

Jon Pienkowski
Pacific Northwest Computers
www.pnwcomputers.com
www.linktr.ee/pnwcomputers
360.624.7379


Friday, September 2, 2022

Microsoft Surface Random "Kernel Power" Shutdown

Microsoft Surface & Surface Pro
"Kernel Power" Shut Down Bug

Here are a few ways you can fix the random "Kernel Power" shutdown issue that some Microsoft Surface and Surface Pro systems can have. 
The issue seems to be tied to the Intel Graphics/Display driver and/or the associated Intel Graphics Command Center software settings.


Option 1: Update the display drivers to the latest version (from Intel, not Microsoft):


Option 2: Disable the "Panel Self Refresh" option in the Intel Graphics Command Center:

  • Install the Intel Graphics Command Center from the Microsoft Store. 
  • Open up the Intel Graphics Command Center software after it has been installed
  • Go to System > Power and look for "Panel Self Refresh"
  • Turn it off for both "On Battery" and "Plugged In"

Option 3: Change the display drivers to the Microsoft Basic Display Adapter:

  • Open the Device Manager.
  • Expand "Display Adapters".
  • Right-click on "Intel(R) Iris(R) Plus Graphics" and select "Update driver".
  • Choose "Browse my computer for driver software".
  • Choose "Let me pick from a list of available drivers on my computer".
  • Select "Microsoft Basic Display Adapter" and click Next to install the drivers.
 

Option 4: Remove "Modern Standby" features and create a new (non-balanced) power plan:

  • Open the Registry Editor and navigate to: "HKEY_LOCAL_MACHINE\SYSTEM\CurrentControlSet\Control\Power".
  • Change the "CsEnabled" value from '1' to '0'. 
  • Click OK and restart the Surface Pro.
  • If you do not see the "CsEnabled" subkey, create it by right-clicking on "Power", selecting "New", and then click "DWORD (32-bit) Value" and typing "CsEnabled" as the value name, and then press Enter.
  • Now you should be able to change the "CsEnabled" value from '1' to '0'. 
  • Click OK and restart the Surface Pro!

One or all of these tricks might be needed to correct the Kernel Power shutdown bug. But I have gotten the problem fixed for clients by using one, or all, of the tricks listed above!


Jon Pienkowski
Pacific Northwest Computers
www.pnwcomputers.com
www.linktr.ee/pnwcomputers
360-624-7379

    Thursday, September 1, 2022

    Fix the "Virus Scan Failed" download error in Google Chrome, and the "Couldn't Download Virus Scan Failed" error in Microsoft Edge

    Fix the "Virus Scan Failed" download error in Google Chrome, and the "Couldn't Download Virus Scan Failed" error in Microsoft Edge

    1. Locate the following registry subkeys:
      \HKEY_LOCAL_MACHINE\SOFTWARE\Microsoft\Windows\CurrentVersion\Policies\Attachments
    2. If you do not see the "Attachments" subkey, create it by right-clicking on "Policies", selecting "New", then clicking "Key", and then typing "Attachments" as the key name.
    3. Right-click "Attachments", select "New", and then click "DWORD (32-bit) Value".
    4. Type "ScanWithAntiVirus" as the value name, and then press Enter.
    5. Right-click the new "ScanWithAntiVirus" DWORD value, and then click "Modify".
    6. In the "Value data" box, type 1, and then click OK.
    7. Exit the Registry Editor.
    8. Restart your computer, and then log back into Windows to have the registry change take effect!

    The download error(s) should be now resolved in both Google Chrome and Microsft Edge!

    Jon Pienkowski
    Pacific Northwest Computers
    www.pnwcomputers.com
    www.linktr.ee/pnwcomputers
    360-624-7379

    Thursday, August 11, 2022

    Guerilla SEO


    Guerilla SEO

    Step 1:

    Have a website made, or build a website for your company.
    For its ease of use and simplicity, we use and recommend Weebly for easily building and maintaining a website inexpensively.

    Step 2:

    Get your business signed-up and set up with “the big guys”:

    Step 3:

    Create a business page, and/or account, with all of the major Social networks. Be sure to Include ALL of your important business information; including your logo, address, phone number, email, website, etc.

    Step 4:

    Once you have all of your social media accounts set up, go through the “Free Web Business Listings” list below and set up a business listing through EACH service. Include ALL of your important business information; including address, phone number, email, website, social media accounts, etc.

    Step 5:

    Create a free Linktr.ee webpage for ALL of the different web links you now have! You can list your main web page, blogs, social media accounts, payment services, etc.

    *Extra:

    If you would like to accept ANY form of payment from your customers (besides check, cash and credit cards) sign up with the following payment services as well:

    Tips, Tricks, and Recommendations:

    1. Purchase your website domain for 2 years or more when signing up or renewing. Renewing your website for just 1 year can make your page appear “temporary” to search engine bots.
    2. If search engine bots come across your website information in different places across the internet, your website will start to rank higher in search results organically due to your site’s “perceived” importance.
    3. I recommend using Instagram as the main “Hub” for the bulk of your social media posts. With Instagram, you can connect your Facebook, Twitter, and Tumblr accounts to share whatever you post on Instagram, to those other social networking platforms as well! From there you can share that same post to other social media platforms by just copying and pasting the post.
    4. Use hashtags in your social media posts to have your posts listed in those associated hashtag categories.
    5. Go through your website page by page, and make sure that certain “keywords”, that you want to be found with, are used at least 4 times on the associated webpage.
    6. When posting to social media, use your main website address AS WELL as your Linktr.ee address.

    Free Web Business Listings:

    A website with a * indicates that either the website is having issues, or the website might be a "paid for" service and may not actually be free.

    Jon Pienkowski
    Pacific Northwest Computers
    www.pnwcomputers.com
    www.linktr.ee/pnwcomputers

    Tuesday, August 9, 2022

    Get your Business Listed Online for FREE!


    Want more people to be able to find your business online?
    Use this list of websites to get your business listed for FREE!

    By listing your company on the various websites listed below, you will help potential customers find you no matter the service or platform they are using! Additionally, having your company information and website information listed around the internet also makes your website look "more important" to search engine crawlers! Which in turn, could improve your web search rankings! Pacific Northwest Computers offers this as a service to our customers as well! So feel free to get in touch with Pacific Northwest Computers if you would like some help getting this all set up for you! 

    Jon Pienkowski
    Pacific Northwest Computers
    360.624.7379

    Monday, May 30, 2022

    Windows Security Center Stops Working - Windows 11

    I have run into a problem repeatedly recently. On a client computer running Windows 11, if I go to open the Windows Security Center, it won't open and I will get the following message/error:

    Some websites will recommend the following:

    "Go to the Settings. Select App > Apps & features and type in ‘security’ in search menu box. An icon for Windows Security will pop open. From there, click on the options (three dots) and select Advanced options. Now scroll down to Reset section and click on Reset.

    You’ll get a confirmation asking if you really want to reset the app, along with your whole app data. Click on Reset to go with it."

    However, so far what I have found is that "Windows Security" is not in the application list at all! 

    So how can I reset the app?

    Well, what I have found was a simple command you can run from the Windows PowerShell (with administrative privileges) that ultimately solved the problem for me, as well as for some of my clients who have run into this same issue as well.

    • Using Windows' search, just type in "PowerShell"


    • Right-click on its icon, and select "Run as Administrator"
    • Next, copy and paste (or type in) the following script:

    Get-AppxPackage Microsoft.SecHealthUI -AllUsers | Reset-AppxPackage

    • Hit Enter, and you should get a screen like this:


    That should do the trick!
    Your Windows Security Center should now be working again!

    Pacific NW Computers
    www.pnwcomputers.com
    360.624.7379

    Thursday, April 28, 2022

    M.2 SSD Not Detected by Windows 11/10 Installer

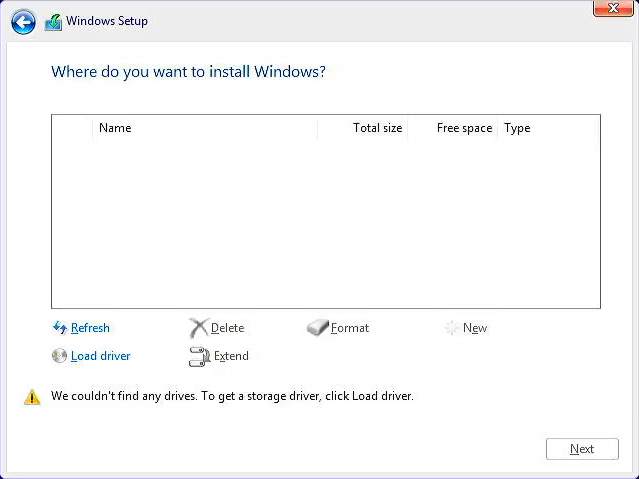
    If you experience that the Windows installer cannot find your M.2/NVMe drives when installing Windows 11/10, try this process of loading the Intel IRST driver to gain access to your SSD drive!


    For the Intel CPU platform, you need to manually install Intel Rapid Storage Technology (IRST) driver during the Windows installation process. You can also refer to the Intel document of How to Configure RAID or Intel Optane Memory with Intel RST on an Intel VMD Capable Platform.
    Note: The following pictures are a reference, it may be varied depending on the different versions.


    Manually install Intel Rapid Storage Technology (IRST) driver

    • Download Intel Rapid Storage Technology (IRST) driver Download Link.
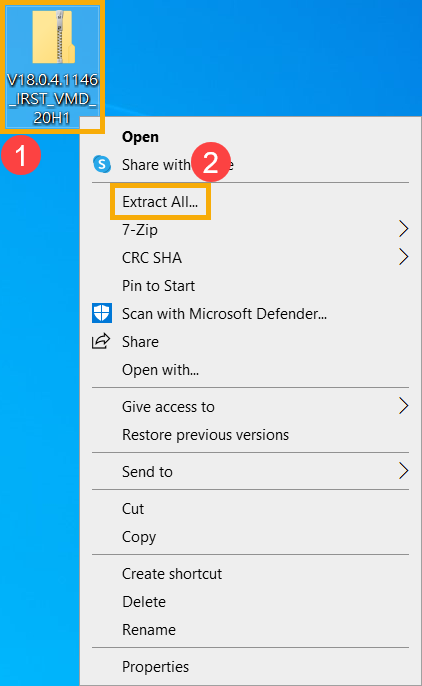
    • After downloading the driver, right-click [V18.0.4.1146_IRST_VMD_20H1] compressed file① and select [Extract All]②.
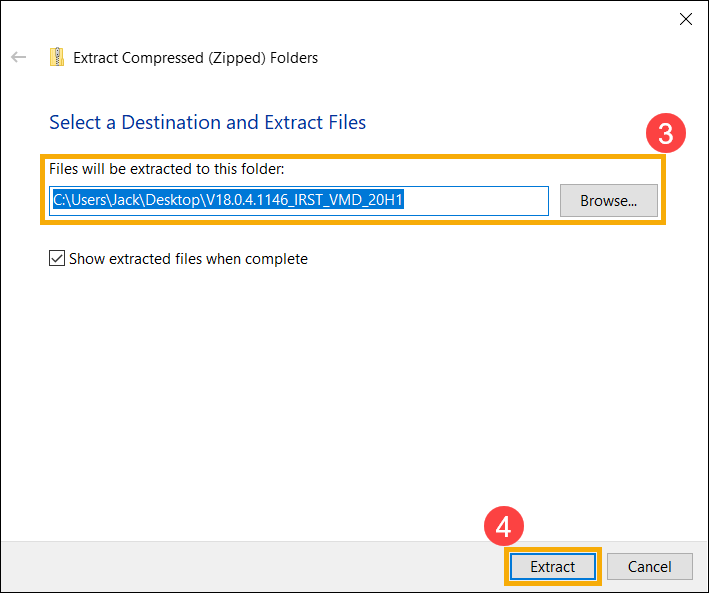
    • Select a Destination③ (such as a USB thumb drive) and click [Extract]④.

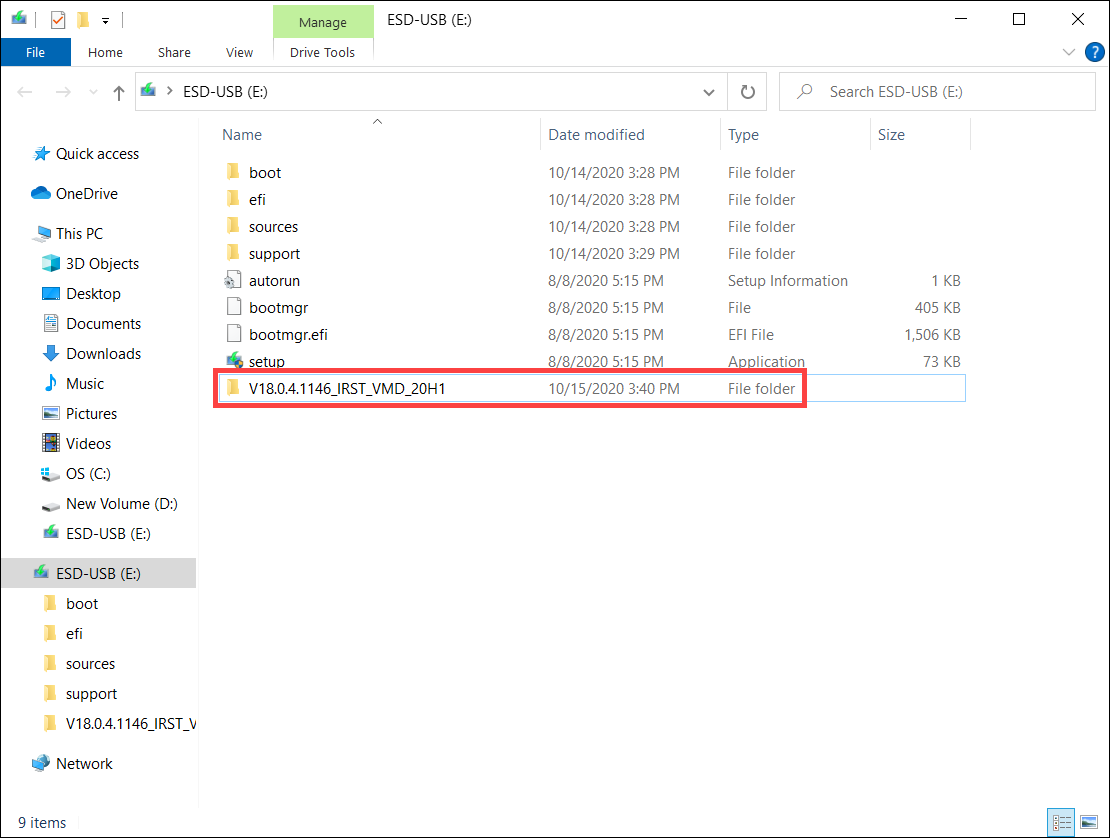
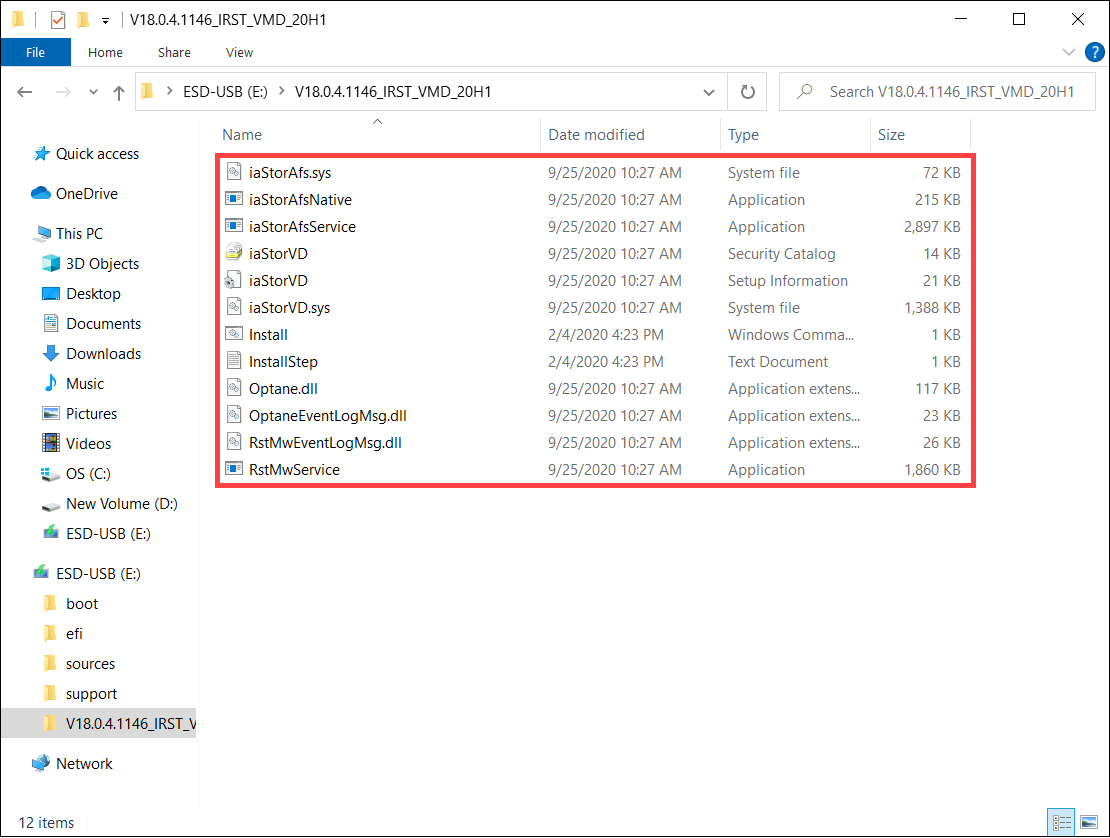
    • After the extraction is completed, please copy the entire folder (V18.0.4.1146_IRST_VMD_20H1) to a USB flash drive.
    • If you used a USB flash drive to create the Windows 11/10 installation media as well, please copy the entire folder to the same USB flash drive which is created as the Windows 11/10 installation media.

    • After the copying is completed, make sure the folder includes the following files.

    Install Intel Rapid Storage Technology (IRST) driver

    • Connect the USB flash drive which includes the Windows 11/10 installation media and Intel Rapid Storage Technology (IRST) driver (V18.0.4.1146_IRST_VMD_20H1 folder) to the target computer. (If you used a DVD to install Windows 11/10, please insert the DVD and consist of the above files USB flash drive to the target computer together.)
    • Restart the Windows 11/10 installation process, here you can learn more about How to use installation media to insatll Windows 11/10.
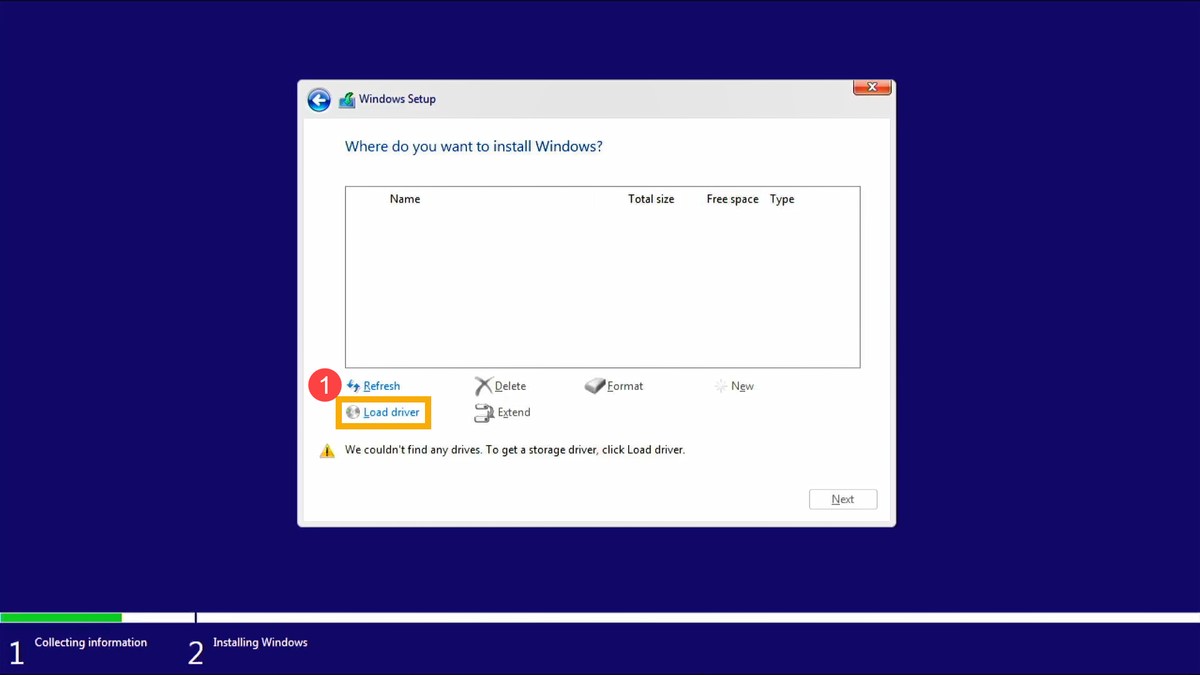
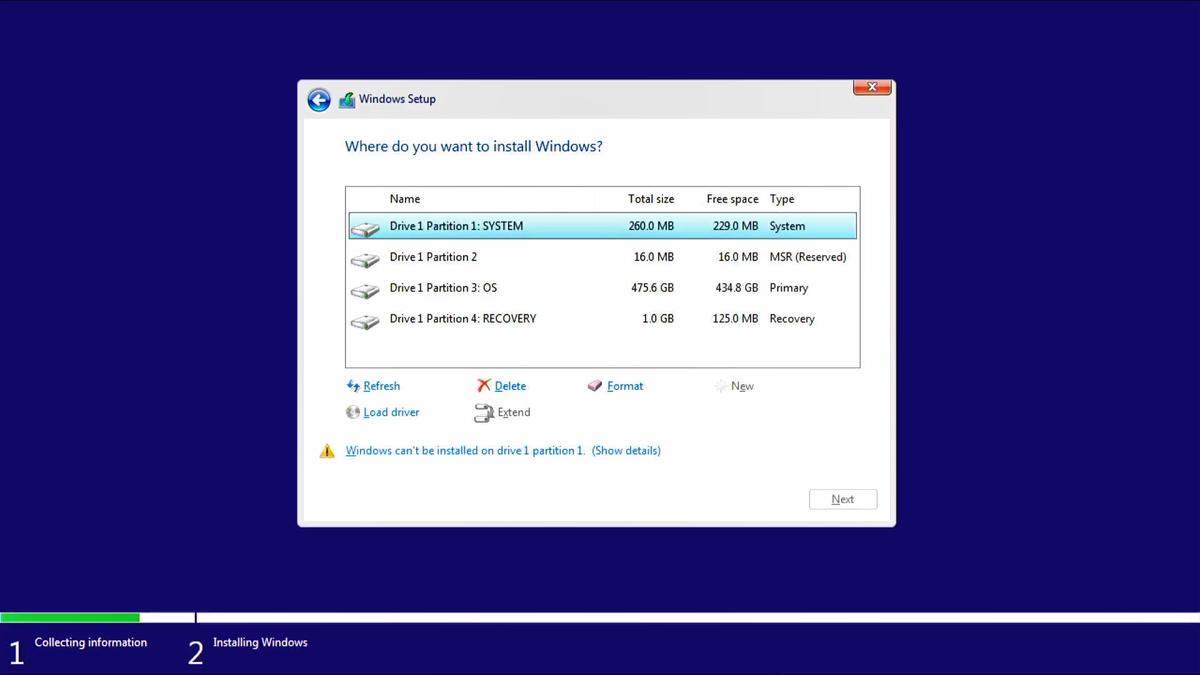
    • On the screen of Where do you want to install Windows and Windows cannot find any drives, please select [Load driver]①.

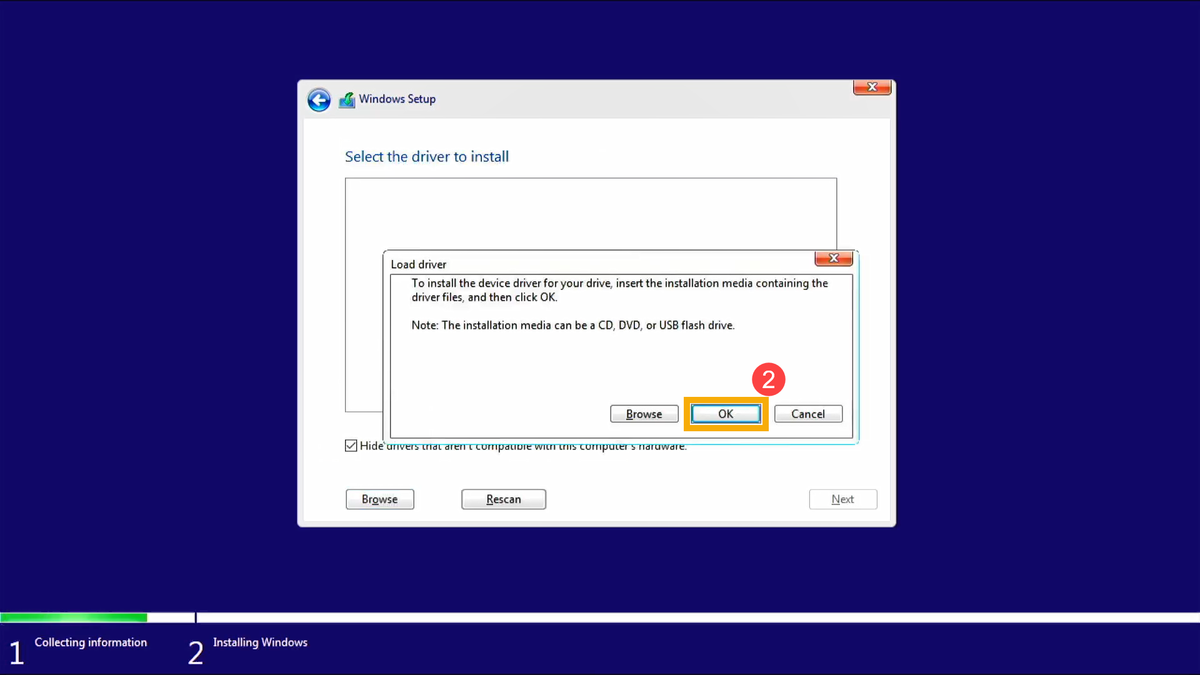
    • Select [OK]②.

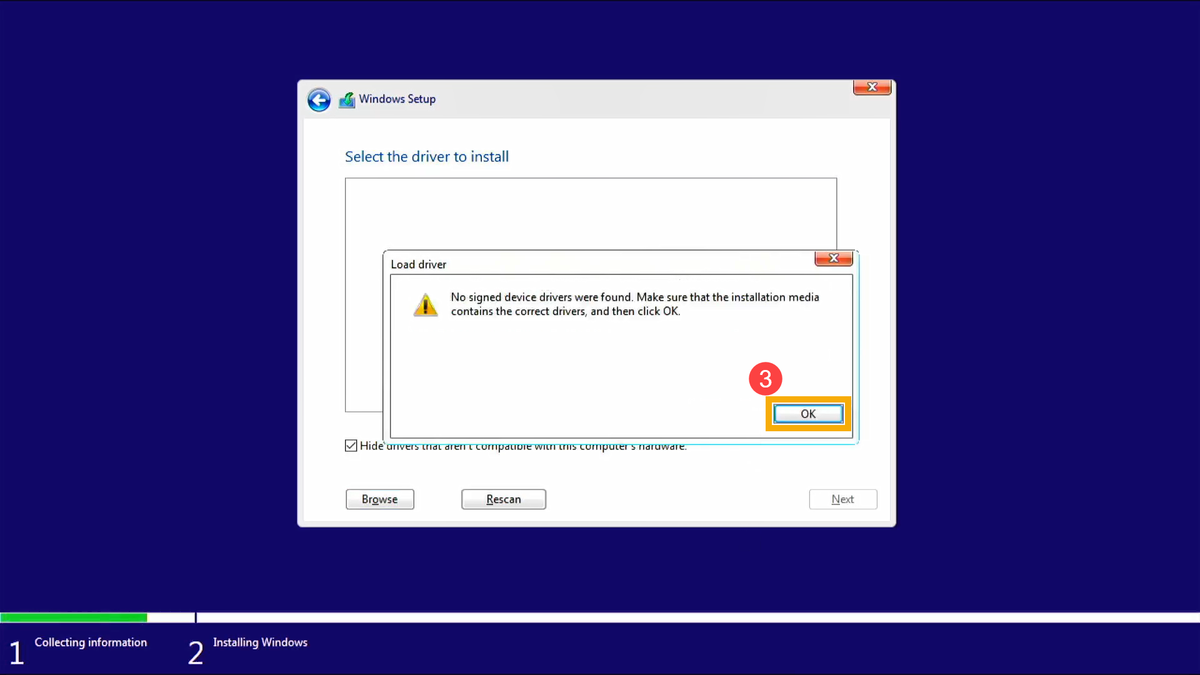
    • Click [OK]③.

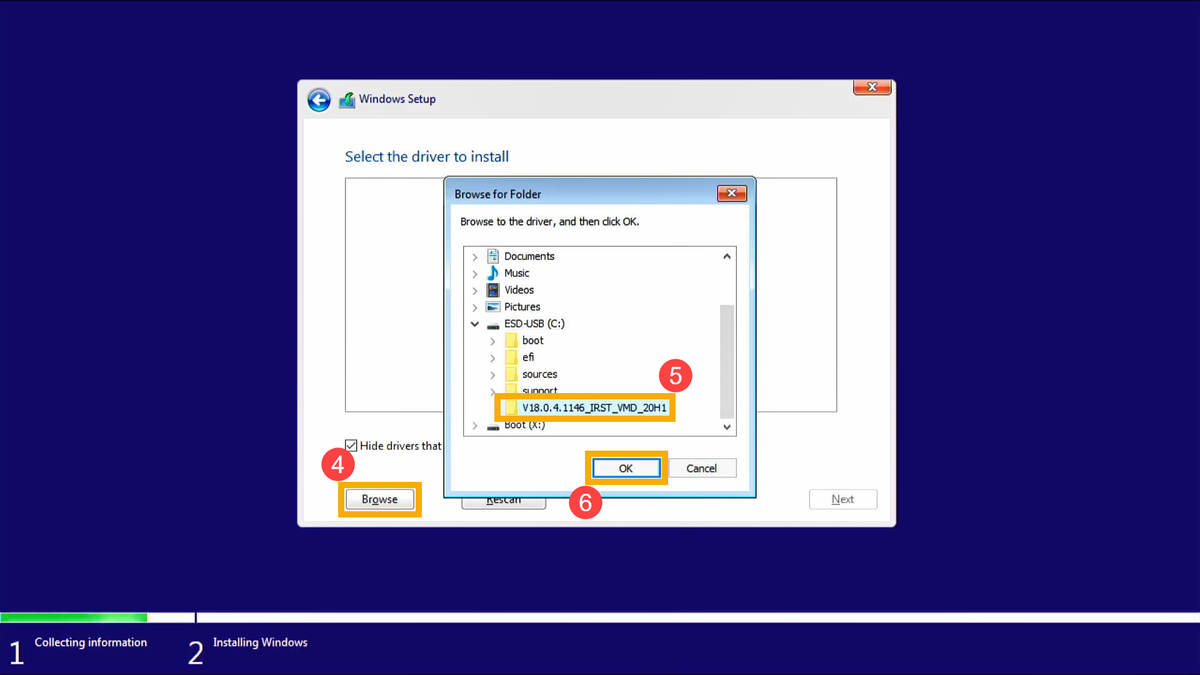
    • Select [Browse]④, then find the [V18.0.4.1146_IRST_VMD_20H1] folder⑤ and select [OK]⑥.

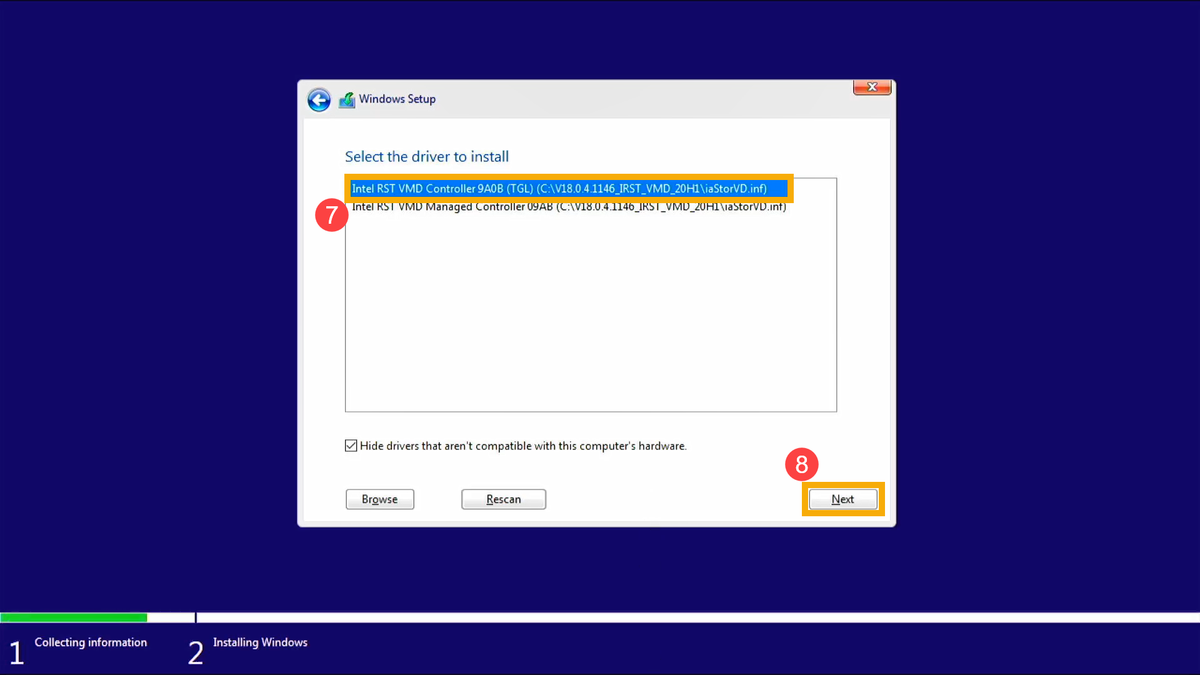
    • Select [Intel RST VMD Controller 9A08 (TGL) ]⑦, then select [Next]⑧ to install the driver.

    • After the driver installation is completed, the drives will appear normally.

    That's it!

    The Windows installer should now see your M.2/NVMe drive!


    Original Article:
    https://www.asus.com/support/faq/1044458

    Thursday, March 17, 2022

    PC, Mac and Linux Disk and Hard Drive Recovery


    R-STUDIO

    Mac, Linux & PC Disk Recovery,
    and Hard Drive Recovery Tool!

    Have you accidentally deleted some data?
    Is your hard drive all of a sudden not letting you access the drive? 
    Does your computer say that it needs to "format the drive" before it can be used?
    Does it seem like your hard drive maybe has died?!
    Well, R-Studio Recovery software from R-Rools might be your saving grace!

    Empowered by the new unique data recovery technologies, R-STUDIO is the most comprehensive data recovery solution for recovery files from NTFS, NTFS5, ReFS, FAT12/16/32, exFAT, HFS/HFS+ and APFS (Macintosh), Little and Big Endian variants of UFS1/UFS2 (FreeBSD/OpenBSD/NetBSD/Solaris) and Ext2/Ext3/Ext4 FS (Linux) partitions. It also uses raw file recovery (scan for known file types) for heavily damaged or unknown file systems. It functions on local and network disks, even if such partitions are formatted, damaged, or deleted. Flexible parameter settings give you absolute control over data recovery.

    www.r-studio.com

    Monday, March 7, 2022

    Ransomware Infection? This could help!!


    Ransomware infections are a very real and very serious problem that general computer users, and businesses alike, should be prepared for!

    • First off, the best prevention to start with is to have good security software installed that can protect you from Ransomware infections (such as Malwarebytes Anti-malware, Kaspersky Antivirus, etc).
    • Secondly, have a good data backup system in place that follows the 3-2-1 backup rule to keep your data safe! 
      • The 3-2-1 backup rule simply states that you should have:
        • 3 copies of your data (your main data and 2 backup copies)
        • On two different media types (NAS drive and a thumb drive)
        • With one copy off-site for disaster recovery (cloud backup, etc).

    If you do get hit with a ransomware infection, the website below can help you identify which ransomware you were infected with and if there is a de-encryption tool available to help get your data/files back: https://id-ransomware.malwarehunterteam.com/


    Pacific NW Computers
    www.pnwcomputers.com
    360.624.7379

    Simple Automatic Backup

    Quick Computer/Laptop Tip:

    If your laptop has an SD card slot and you don't have a data backup system in place, you can use an SD card to set up an automatic backup of your Windows computer!
    No clunky external hard drive is needed if you aren't storing a ton of stuff! 

    • Snag a compatible 128, 256, or 512GB Class 10 U3 V30 or better SD card off of Amazon
    • Pop that little chip into the card reader slot on your laptop.
    • Open up the "Backup and Restore (Windows 7)" system utility from the Windows Control Panel. 
    • Select the installed SD card as your backup destination and continue with, and complete, the backup configuration! 
    • Then just leave the SD card plugged in, and the computer will automatically backup to the installed SD as scheduled!

    That's it! 🙌
    Easy peasy, lemon squeezy; your data is now automatically backed up! 

    Pacific NW Computers
    www.pnwcomputers.com
    360.624.7379

    Monday, February 28, 2022

    Upgrade your Windows 10 PC to Windows 11 NOW!

    No need to wait for the Windows Update to come along... You can download and install Windows 11 RIGHT NOW!

    All you have to do is use Microsoft's Windows 11 Installation Assistant, and you can upgrade your computer today!

    You need to make sure your system is compatible and meets the minimum system requirements for Windows 11. You can check your computer's compatibility by using Microsoft's PC Health Check application!

    Windows 11 System Requirements:

    • Processor 1 gigahertz (GHz) or faster with 2 or more cores on a compatible 64-bit processor or System on a Chip (SoC).
    • RAM Minimum of 4 gigabyte (GB).
    • Storage: 64 GB or larger storage device.
    • System firmware UEFI, Secure Boot capable. Check here for information on how your PC might be able to meet this requirement.
    • TPM Trusted Platform Module (TPM) version 2.0. Check here for instructions on how your PC might be enabled to meet this requirement.
    • Graphics card Compatible with DirectX 12 or later with WDDM 2.0 driver.
    • Display High definition (720p) display that is greater than 9” diagonally, 8 bits per color channel.

    Monday, February 21, 2022

    How to Dispose of Batteries

    How to Dispose of Batteries

    Batteries power a variety of portable devices. Everything from cordless phones and laptops to cars and toys use battery power. Eventually, a battery stops powering a device or fails to charge. That means it’s time to replace it!
    Knowing how to dispose of batteries properly helps protect the environment. Whether they're rechargeable AA batteries or single-use alkaline batteries, learn safe disposal. This guide offers tips on battery disposal and battery recycling.

    Single-Use vs. Rechargeable Batteries

    • There are two basic types of batteries in use: rechargeable and single-use or disposable ones.
    • Rechargeable batteries can be charged many times before they're replaced. They're found in cordless phones, smartphones, and digital cameras. Power tools and similar devices that drain energy quickly use them too.
    • Single-use batteries are found in alarm clocks, remotes, and other gadgets. They're designed to be used as long as the cell makes electricity.

    Can Batteries Be Thrown Out?

    • Batteries contain chemicals and metals that produce a reaction to generate electrical energy. While the recycling of batteries is encouraged to protect the environment, you can throw out some types. Common household alkaline batteries are considered non-hazardous. You may toss out alkaline batteries with ordinary trash.
    • Button cell batteries used in items like remote car starters and watches contain silver and mercury. They must be recycled. In California, all household batteries are categorized as hazardous waste. Batteries must be brought to a household hazardous waste disposal facility. Another option is recycling at an authorized recycling facility in the state.

    How to Dispose of Alkaline Batteries

    • Alkaline batteries include AA, AAA, 9 volt and D cells. Small batteries may run remote controls or flashlights. Larger batteries power smoke detectors, clocks and wireless consumer devices. Even when the cells no longer run devices, the batteries can still produce current. They can be hazardous if discarded improperly. Take these precautions before throwing them out:
    • Collect used household batteries in a container. A cardboard box or plastic tub is a safe option.
    • Prevent any fire risk by taping 9-volt battery terminals before tossing.

    How to Dispose of Rechargeable Batteries

    • The types of rechargeable batteries in use include lithium-ion and nickel-cadmium. Other types are nickel-metal hydride, nickel-zinc, and small sealed lead batteries. The toxic metals that generate energy in these batteries can hurt the environment if discarded incorrectly.
    • Rechargeable 9-volt batteries, AA and AAA batteries, and D cells for household use look like alkaline batteries. The difference is they fit compatible plug-in chargers. Rechargeable batteries are recycled. Look for the battery recycling seals on rechargeable batteries.

    Tip: Remove batteries from broken cordless phones, smartphones, and laptops. They'll be ready whether you give away, throw away or recycle the device.


    Where to Recycle Batteries

    Recycling companies dispose of the components of rechargeable batteries responsibly and properly. The metals and chemicals don’t end up in streams and landfills. Here are some options for recycling:

    • Call2Recycle, is a nonprofit battery recycling program. Rechargeable batteries can be dropped off in Call2Recycle bins at partnered store locations. Any rechargeable battery that weighs up to 11 pounds and is under 300-watt hours is accepted. There's no charge for recycling.
    • Many local solid waste districts host collection events for residents to drop off batteries.
    • Some battery manufacturers and recycling facilities have mail-in programs. Before mailing batteries, be sure to follow postal shipping precautions.
    • Most auto care retailers accept car batteries for recycling.

    Common types of recyclable batteries:

    • Lithium-Ion (L-Ion) battery: These batteries are often used in personal electronics such as smartphones. They also run laptop computers, tablets and cordless power tools.
    • Nickel Cadmium (Ni-Cd) Batteries: These rechargeable cells are used in power tools and communication devices. They're for devices that require high current draw but aren't in constant use.
    • Nickel Metal Hydride (Ni-MH) battery: These rechargable batteries come in AA, AAA, 9 volt and D cells. They're used in digital cameras and other devices that drain power quickly.
    • Small Sealed Lead Acid (SLA) Battery: These rechargeable batteries are often used in large items like motor vehicles and lawn mowers. They're also power medical devices and telecommunications.

    Practice the proper disposal of used batteries. Knowing how to correctly discard household and rechargeable batteries helps the environment!!


    Wednesday, February 16, 2022

    Mac Battery/Power Management System Calibration

    Calibrating The Battery/Power Management System of a Mac Is Easy To Do!

    On a new Apple computer, or after a new battery is installed...

    Step 1 – Charge The Battery To 100%

    • Shut down the computer and then connect the power adapter.
    • Keep the computer plugged in until the light on the power connector turns green indicating a 100% charge.

    Step 2 – Charge Two More Hours

    • After the battery is 100% charged, keep the power adapter plugged into the computer for an additional 2+ hours. 
    • The computer can be powered up and used during this time.

    Step 3 – Temporarily Change the Energy Saver Settings

    • If the computer is off, you'll need to turn it on.
    • In OS X System Preferences click on the Energy Saver preferences.
    • In the Energy Saver / Battery preferences:
      • Set the "Turn display off after:" slider to "Never"
    • Various Mac models may have two sliders for "computer sleep" and "display sleep". If you have two sliders, simply slide both to the right to set them to "Never"
      • UNCHECK "Put hard disks to sleep when possible"
      • UNCHECK "Slightly dim the display while on battery power"
        • Note: The location/existence of certain settings may shift or vary depending on your computer model or OS version.
    • In the Energy Saver / Power Adapter preferences:
      • Set the "Turn display off after:" slider to "Never"
      • Various Mac models may have two sliders for "computer sleep" and "display sleep". If you have two sliders, simply slide both to the right to set them to "Never"
      • CHECK "Prevent computer from sleeping automatically when the display is off"
      • Note: this setting may or may not be available depending on your model or OS version.
      • UNCHECK "Put hard disks to sleep when possible"
        • Note: The location/existence of certain settings may shift or vary depending on your computer model or OS version.

    Step 5 – Unplug And Drain The Battery

    • Unplug the power adapter.
    • Leave the computer on until it automatically shuts down.
    • You can use the computer during this step, but don't put the computer through heavy use to deplete the battery faster. Steady, even usage is better for power system calibration.

    Step 6 – Leave It Off And Unplugged

    • After the computer has automatically shut down, leave it shut down for at least 5 hours or overnight. 
    • This will ensure the battery is completely drained of energy.

    Step 7 – Charge To 100% Again

    • Plug the computer back in until the battery is 100% charged.
    • While plugged in, the computer can be used.
    • This is also a good time to go back and select your desired Energy Saver preferences.

    AND THAT'S IT!

    After this essential calibration, the new battery will be able to achieve its fullest charge and reach its full lifespan, and the system will display an accurate battery level. You can also reuse these steps to recalibrate the power management system every few months if desired.