Showing posts with label intel. Show all posts

Tuesday, March 11, 2025

Intel CPU Instability Issues; 13th & 14th Gen Processors

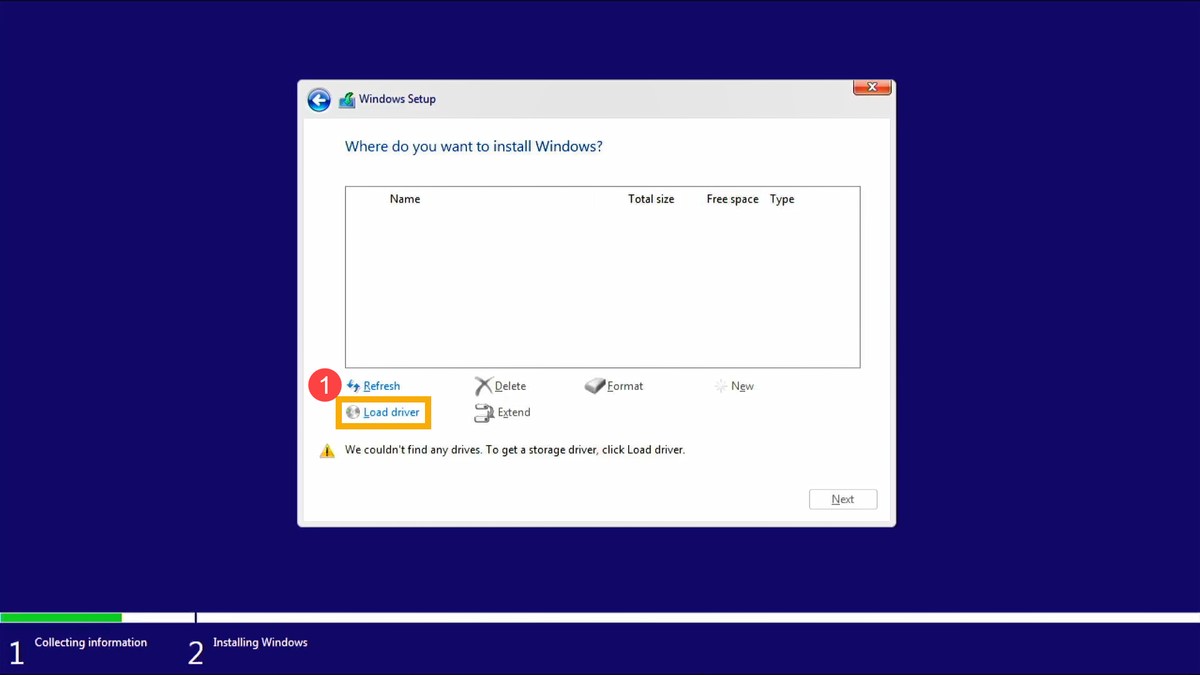
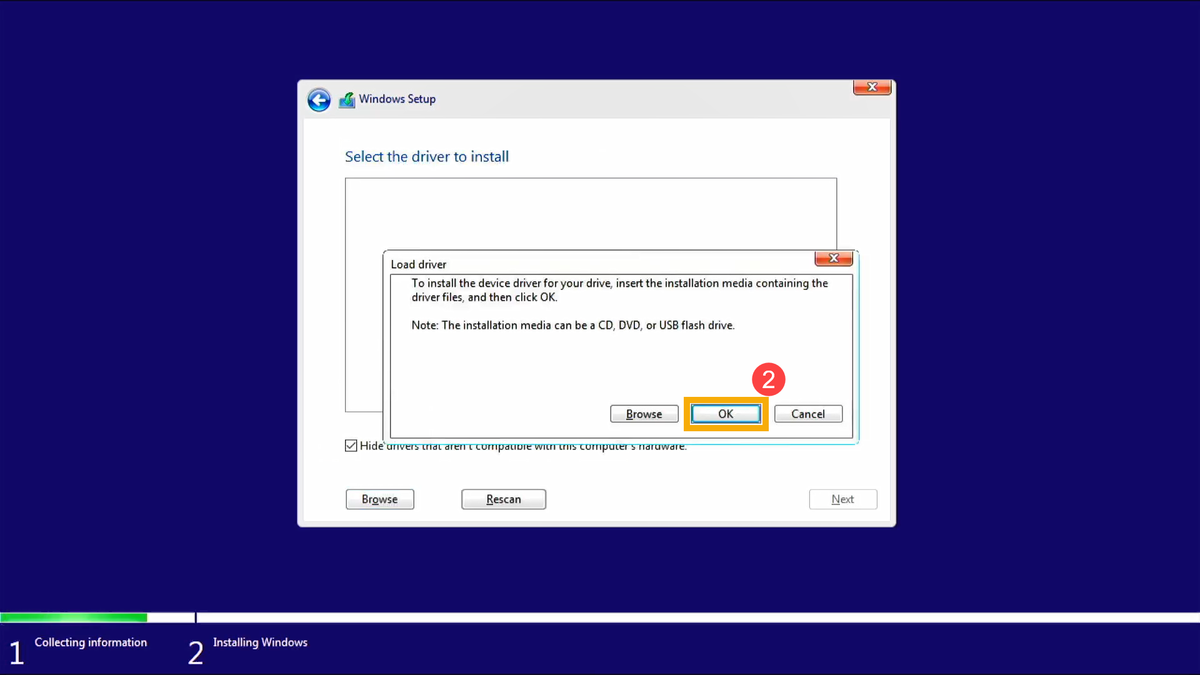
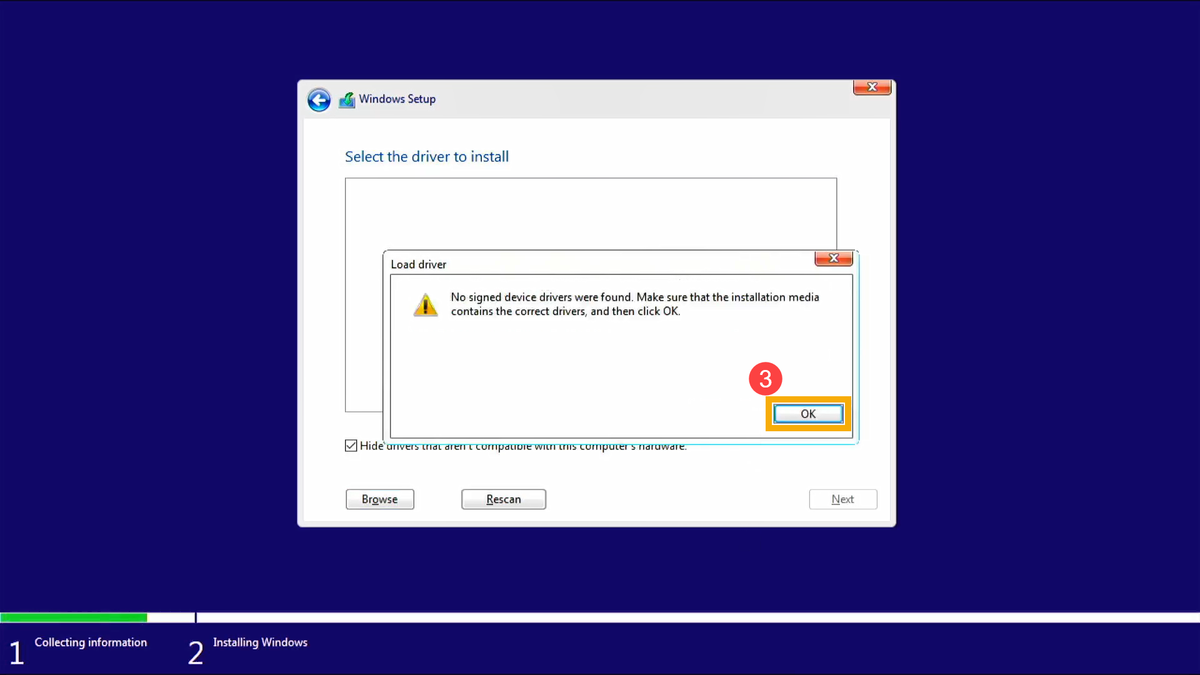
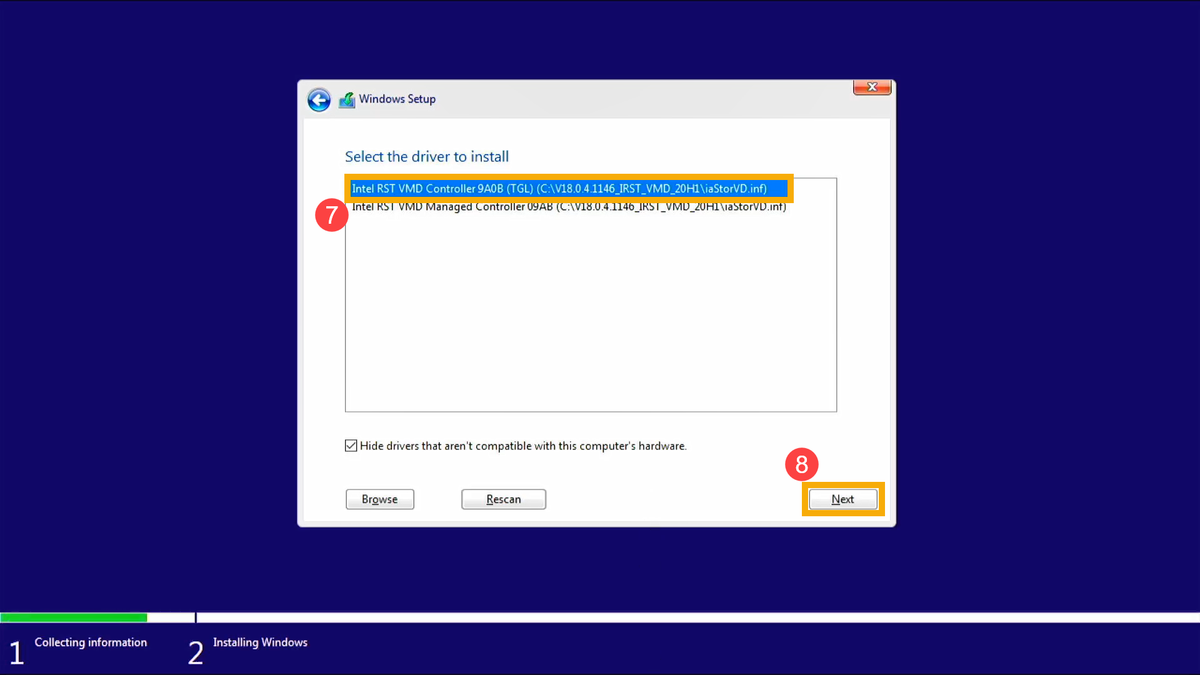
​Intel has addressed instability issues in its 13th and 14th Gen Core desktop processors, particularly the K, KF, and KS-series Core i5, i7, and i9 models. These issues were linked to elevated operating voltages causing premature aging and system instability.
(​The Verge)

To mitigate these problems, Intel released microcode updates, including version 0x12B, which limit voltage requests above 1.55V. This update aims to improve stability without significantly impacting performance. ​
(techpowerup.com)

It's important to note that processors already experiencing instability due to this issue cannot be repaired through software updates. Intel has extended the warranty for affected processors by two years, allowing users to seek replacements if necessary.
(​The Verge)

Intel's 13th and 14th Gen mobile processors, including the HX-series, as well as non-K-series Core i5, i3, and Xeon desktop processors, are not affected by this voltage instability issue. ​
(Hacker News - The Verge)

For users with affected desktop processors, it's recommended to update the BIOS with the latest microcode to prevent potential instability. If instability symptoms are already present, contacting Intel Customer Support or the original place of purchase for assistance is advised.

*Intel does claim the problems HAVE been indeed fixed through the 0x12B micro code update via manufacturer-released BIOS updates!

Here Are Some Key Concerns:

  1. High Power & Heat – The Alder Lake architecture introduced a hybrid core design, but the i9-12900K was known for running hot, especially under heavy loads, requiring strong cooling solutions.
  2. Voltage Spikes & Instability – Some motherboards pushed aggressive power limits by default, leading to overheating and potential thermal throttling.
  3. BIOS & VRM Issues – Some motherboards had BIOS issues that didn’t properly regulate power delivery, causing instability and even damage to some chips.
  4. Windows 11 Performance Issues (Early On) – Some early issues with Windows 11’s scheduler not properly utilizing the P-Cores and E-Cores led to performance inconsistencies.
  5. DDR4 vs. DDR5 Compatibility – Early motherboard BIOS versions sometimes had stability issues when using DDR5.
  6. Melting 12VHPWR Connectors (Rare Cases) – Some reports suggested high power draw causing issues with PSU connectors in extreme overclocking scenarios.
  7. Potential Degradation – Overclocking (even within Intel’s own limits) has led to faster degradation of some 13900K chips, requiring undervolting or power limit adjustments for longevity.

If You’re Using ANY of The Affected CPUs, We Recommend The Following:


1. BIOS & Firmware Updates

  • Keep BIOS Up to Date: Intel often releases microcode updates to fix performance issues and bugs.
  • Disable Unused Features: If you're not using E-Cores (Efficiency Cores), you can disable them for better single-threaded stability.

2. Cooling and Thermal Management

  • Use a High-Quality Cooler: Both CPUs run hot, so an AIO liquid cooler (240mm or larger) or a high-end air cooler (Noctua NH-D15, Deepcool Assassin III, etc.) is recommended.
  • Apply Good Thermal Paste: Use high-quality thermal paste like Thermal Grizzly Kryonaut or Arctic MX-6 for better heat transfer.
  • Enable Thermal Limits: In the BIOS, set PL1 and PL2 (Power Limits) to reasonable values to prevent overheating.2. Power Delivery & Motherboard Settings
  • Use a Good Motherboard: Ensure you use a Z690/Z790 board with strong VRMs (e.g., ASUS ROG Maximus, MSI MEG, Gigabyte Aorus Master).
  • Disable or Adjust Power Limits: Some motherboards default to unlimited power limits, causing excessive heat and power draw.
  • Set Load-Line Calibration (LLC): Adjusting LLC to a moderate level (Level 3-4) can help with voltage stability.

3. Memory and Stability Tuning

  • Use Stable RAM Speeds: DDR5-6000 to 6400 CL30 is the sweet spot for Raptor Lake (13900K).
  • Avoid XMP Issues: Some boards struggle with XMP. If you have stability issues, try manually adjusting VDDQ, VCCSA, and IMC voltages.

4. Preventing VRM and PSU Problems

  • Use a High-Quality PSU: A minimum of 850W (Gold-rated or better) is recommended.
  • Watch for VRM Throttling: If using a budget board, check VRM temperatures under load to avoid power throttling.

5. Avoiding Warping/Bending Issues

  • Use a Contact Frame: The Intel LGA1700 socket is prone to CPU bending, causing poor contact with the cooler. Consider a Thermalright or Caseking contact frame to maintain even pressure.
  • Check for Uneven Cooling Contact: If you see uneven thermal paste spread, your cooler might not be making proper contact.

6. Undervolting for Efficiency

  • Try Intel’s Adaptive Undervolting: You can reduce power draw and temps without losing performance by setting a negative voltage offset in BIOS (-0.05V to -0.1V).
  • Use Intel XTU (Extreme Tuning Utility): You can experiment with undervolting without committing changes in BIOS.

7. Monitor Performance and Stability

  • Use HWMonitor or HWInfo: Keep an eye on temps, voltages, and power draw during gaming or heavy workloads.
  • Run Stability Tests: Use Cinebench, Prime95 (small FFTs), or OCCT to ensure system stability.


Monday, April 1, 2024

What Specs Do You Need In A New Computer!?

CPUs:

Both Intel and AMD employ a numbering system to classify their CPU models based on their respective performance.

AMD Ryzen Series:
  • Ryzen 3: Entry-level processors suitable for basic tasks.
  • Ryzen 5: Mid-range CPUs with good performance for multitasking and light gaming.
  • Ryzen 7: High-performance processors designed for demanding tasks, including content creation and gaming.
  • Ryzen 9: Top-tier CPUs for power users, professionals, and enthusiasts.
Intel Core Series:
  • i3: Entry-level processors for everyday computing needs.
  • i5: Mid-range CPUs offering a balance of performance and affordability.
  • i7: High-performance processors suitable for gaming, content creation, and productivity.
  • i9: Premium CPUs with exceptional performance for intensive workloads.

Higher model numbers generally indicate better performance, but it’s essential to consider other factors like clock speed, cache size, and core count. We usually recommend CPUs be 2Ghz or higher.

Thursday, April 28, 2022

M.2 SSD Not Detected by Windows 11/10 Installer

If you experience that the Windows installer cannot find your M.2/NVMe drives when installing Windows 11/10, try this process of loading the Intel IRST driver to gain access to your SSD drive!


For the Intel CPU platform, you need to manually install Intel Rapid Storage Technology (IRST) driver during the Windows installation process. You can also refer to the Intel document of How to Configure RAID or Intel Optane Memory with Intel RST on an Intel VMD Capable Platform.
Note: The following pictures are a reference, it may be varied depending on the different versions.


Manually install Intel Rapid Storage Technology (IRST) driver

  • Download Intel Rapid Storage Technology (IRST) driver Download Link.
  • After downloading the driver, right-click [V18.0.4.1146_IRST_VMD_20H1] compressed file① and select [Extract All]②.
  • Select a Destination③ (such as a USB thumb drive) and click [Extract]④.

  • After the extraction is completed, please copy the entire folder (V18.0.4.1146_IRST_VMD_20H1) to a USB flash drive.
  • If you used a USB flash drive to create the Windows 11/10 installation media as well, please copy the entire folder to the same USB flash drive which is created as the Windows 11/10 installation media.

  • After the copying is completed, make sure the folder includes the following files.

Install Intel Rapid Storage Technology (IRST) driver

  • Connect the USB flash drive which includes the Windows 11/10 installation media and Intel Rapid Storage Technology (IRST) driver (V18.0.4.1146_IRST_VMD_20H1 folder) to the target computer. (If you used a DVD to install Windows 11/10, please insert the DVD and consist of the above files USB flash drive to the target computer together.)
  • Restart the Windows 11/10 installation process, here you can learn more about How to use installation media to insatll Windows 11/10.
  • On the screen of Where do you want to install Windows and Windows cannot find any drives, please select [Load driver]①.

  • Select [OK]②.

  • Click [OK]③.

  • Select [Browse]④, then find the [V18.0.4.1146_IRST_VMD_20H1] folder⑤ and select [OK]⑥.

  • Select [Intel RST VMD Controller 9A08 (TGL) ]⑦, then select [Next]⑧ to install the driver.

  • After the driver installation is completed, the drives will appear normally.

That's it!

The Windows installer should now see your M.2/NVMe drive!


Original Article:
https://www.asus.com/support/faq/1044458