With more than 20 years of experience, Pacific NorthWest Computers provides affordable on-site and in-shop computer repair services in Washington and Oregon State! We provide services ranging from onsite and remote support, malware removal, data recovery, laptop hardware repairs, custom-built computers, networking, security services, consulting/training, and many other computer/tech-related support and services! www.linktr.ee/pnwcomputers
Monday, September 8, 2025
Enroll in the Windows 10 ESU Program
Ensure Spam Filtering Is Active & Set-Up: Microsoft Outlook
Ensure Spam Filtering Is Active & Set-Up Correctly in Microsoft Outlook
In today’s digital workplace, email remains a critical communication tool, but it’s also a prime target for spam and phishing attacks. While Microsoft Outlook offers robust built-in spam filtering, no system is perfect. Some unwanted messages inevitably slip through the cracks, cluttering your inbox and potentially posing security risks.
This guide walks you through two essential strategies to keep your inbox clean and secure:Ensuring Outlook’s spam filtering is active and properly configured.
Creating custom rules to catch and remove spam that evades automatic detection.
Friday, August 29, 2025
Solving OneDrive For Business (Work/School) Errors & Issues
Solving OneDrive For Business Issues:A Complete Troubleshooting Guide
OneDrive for Business is an essential tool for workplace collaboration, but like any cloud service, it can sometimes hit snags that disrupt your workflow. Whether you're dealing with sync issues, account confusion, or the dreaded "Cloud Provider Not Connected" error, this comprehensive guide will help you get back on track quickly.The Most Common OneDrive Business Problems
Before diving into solutions, it's important to understand that most OneDrive issues stem from a few common sources: account mismatches, version confusion between personal and business accounts, connectivity problems, or corrupted sync processes. The good news? Most of these issues have straightforward fixes.Wednesday, February 5, 2025
Free Technical Certifications
There are several free technical certifications available that can help build IT skills boost your resume and to start you on a path towards a career in IT. While some certifications are entirely free, others may require a small testing fee. Here are some of the best options:
Wednesday, April 19, 2023
How to Create a Local Account When Setting up a NEW Windows 11 Computer
How to Create a Local Account When Setting up a NEW Windows 11 Computer
We figured out a way to create a local account on Windows 11 when you are installing a fresh OS or setting up a new system! With this trick, you can steer clear of the Microsoft account requirement for Windows 11!
The easiest way to set up Windows without a Microsoft account is using a "dummy account" that was set up for this exact purpose. You don’t need to open Command Prompt, run commands, or disable the internet connection here. It’s a tried-and-tested method, and it just works without any fuss.
Here’s how to go about it:
- First, connect to the Wi-Fi and proceed with the Windows setup as normal. If you have a wired Ethernet connection, keep it connected.
- When you reach the Microsoft sign-in screen, enter a@a.com under the email field and click on “Next”. Do not worry, it’s a locked dummy account used for bypassing the Microsoft account requirement.
- On the next page, enter any password you like just to complete the steps.
- Now, click on “Sign in“.
- Since it’s a locked account, Microsoft will straight away start setting up a local account for you. You will see an “Oops, something went wrong” error, and then you can create a local account on Windows 11. Simply click on “Next”.
- Now you can now use Windows 11 without logging into a Microsoft account!
*UPDATE* 4-24-2024
The method listed above has been proving more and more ineffective in bypassing the mandatory requirement to set up a new Windows 11 computer, with a Microsoft account. But there's a simple trick for setting up a local account that involves issuing a command to keep Windows from requiring the Internet to install/set up and then cutting off the Internet at just the right time in the setup process. This works the same way whether you are doing a clean install of Windows 11 or following the OOBE process on a store-bought computer.
1. Follow the Windows 11 install process/setup process until you get to the "choose a country" screen:
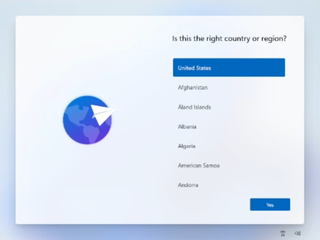
(Image credit: Tom's Hardware)
*Now's the time to cut off the Internet. However, before you do, you need to issue a command that prevents Windows 11 from forcing you to have an Internet connection.
2. Hit Shift + F10. A command prompt appears.
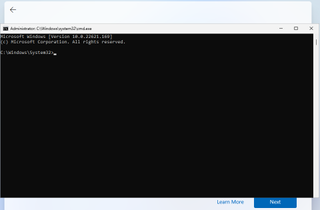
3. Type OOBE\BYPASSNRO to disable the Internet connection requirement.
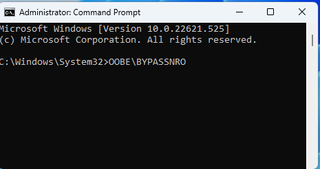
*The computer will reboot and return you to this screen.
4. Hit Shift + F10 again and this time Type ipconfig /release. Then hit Enter to disable the Internet. Alternatively you could also simply unplug the network cable if that's at all possible.
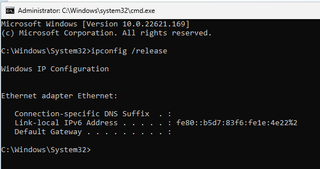
5. Close the command prompt.
6. Continue with the installation, choosing the region. keyboard and second keyboard option.
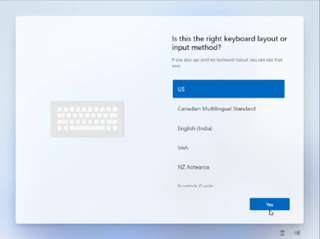
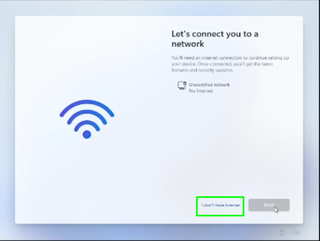
*A screen saying "Let's connect you to a network" appears, warning you that you need the Internet.
7. Click "I don't have Internet" to continue.
8. Click Continue with limited setup.
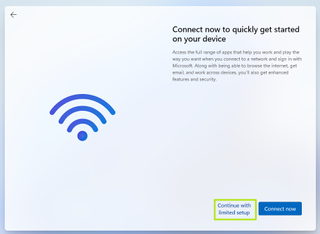
(Image credit: Tom's Hardware)
A new login screen appears asking "Who's going to use this device?"
9. Enter a username you want to use for your local account and click Next.
You are now setting up a local user account to be used, instead of being associated with a Microsoft Account!
Friday, April 7, 2023
Test Your Laptop Battery (Windows 10, Windows 11)

Easily test your Windows 10 or Windows 11 laptop's battery with a simple command using the built-in Microsoft Windows Powershell!
- Open the Windows PowerShell by right-clicking on the Start menu icon and selecting "Windows PowerShell (Admin)" from the menu that appears.
- A pop-up window may ask for permission to make changes to your device; say yes.
- The blue PowerShell command window will appear.
- In the window that opens up, enter:
powercfg /batteryreport /output "C:\battery-report.html"
- Press Enter to run the command.
- PowerShell will then tell you the name of the generated battery life report HTML file and where it has been saved on your computer.
- It should be located at the root of your C:\ drive.
- You can now close the PowerShell window.
- Next, open File Explorer and access the C: drive.
- There, you should find the battery life report saved as an HTML file called, "battery-report.html"
- Double-click the file to open it in your default web browser.
- In the report, find the Design Capacity and Full Charge Capacity of your laptop's battery.
- Now, using a calculator on your phone or your computer, divide the Full Charge Capacity by the Design Capacity amounts.
- If the result on your calculator is 0.80 or less, it may be time to replace your battery!
Friday, March 3, 2023
Windows 11 Local Security Authority Protection Is Off & Won't Turn Back On!?
HKEY_LOCAL_MACHINE\SYSTEM\CurrentControlSet\Control\Lsa
Once there, right-click anywhere on the list on the right side to bring up the context menu. Select New>DWORD (32-bit). Make sure you don't click QWORD (64-bit) by accident. If you're seeing a list that says "Modify" and some other options, left-click anywhere on the white space in the list to deselect whatever is selected there and right-click again.
Now name the new entry "RunAsPPLBoot", then right-click the "RunAsPPLBoot" entry and click Modify. The "Value" box should already be highlighted, enter 2 and click OK. Close the registry editor without modifying anything else, and restart your computer.
Wednesday, January 4, 2023
Find Your Microsoft BitLocker Recovery Key
But you have no idea what BitLocker is, what BitLocker does, nor do you know what to do!
Friday, September 2, 2022
Microsoft Surface Random "Kernel Power" Shutdown
Microsoft Surface & Surface Pro
"Kernel Power" Shut Down Bug
Here are a few ways you can fix the random "Kernel Power" shutdown issue that some Microsoft Surface and Surface Pro systems can have.
The issue seems to be tied to the Intel Graphics/Display driver and/or the associated Intel Graphics Command Center software settings.
Option 1: Update the display drivers to the latest version (from Intel, not Microsoft):
- Download and install the latest display drivers from Intel:
https://www.intel.com/content/www/us/en/download/19344/intel-graphics-windows-dch-drivers.html
Option 2: Disable the "Panel Self Refresh" option in the Intel Graphics Command Center:
- Install the Intel Graphics Command Center from the Microsoft Store.
- Open up the Intel Graphics Command Center software after it has been installed
- Go to System > Power and look for "Panel Self Refresh"
- Turn it off for both "On Battery" and "Plugged In"
Option 3: Change the display drivers to the Microsoft Basic Display Adapter:
- Open the Device Manager.
- Expand "Display Adapters".
- Right-click on "Intel(R) Iris(R) Plus Graphics" and select "Update driver".
- Choose "Browse my computer for driver software".
- Choose "Let me pick from a list of available drivers on my computer".
- Select "Microsoft Basic Display Adapter" and click Next to install the drivers.
Option 4: Remove "Modern Standby" features and create a new (non-balanced) power plan:
- Open the Registry Editor and navigate to: "HKEY_LOCAL_MACHINE\SYSTEM\CurrentControlSet\Control\Power".
- Change the "CsEnabled" value from '1' to '0'.
- Click OK and restart the Surface Pro.
- If you do not see the "CsEnabled" subkey, create it by right-clicking on "Power", selecting "New", and then click "DWORD (32-bit) Value" and typing "CsEnabled" as the value name, and then press Enter.
- Now you should be able to change the "CsEnabled" value from '1' to '0'.
- Click OK and restart the Surface Pro!
One or all of these tricks might be needed to correct the Kernel Power shutdown bug. But I have gotten the problem fixed for clients by using one, or all, of the tricks listed above!
Jon Pienkowski
Pacific Northwest Computers
www.pnwcomputers.com
www.linktr.ee/pnwcomputers
360-624-7379
Thursday, September 1, 2022
Fix the "Virus Scan Failed" download error in Google Chrome, and the "Couldn't Download Virus Scan Failed" error in Microsoft Edge
Fix the "Virus Scan Failed" download error in Google Chrome, and the "Couldn't Download Virus Scan Failed" error in Microsoft Edge
- Locate the following registry subkeys:
\HKEY_LOCAL_MACHINE\SOFTWARE\Microsoft\Windows\CurrentVersion\Policies\Attachments - If you do not see the "Attachments" subkey, create it by right-clicking on "Policies", selecting "New", then clicking "Key", and then typing "Attachments" as the key name.

- Right-click "Attachments", select "New", and then click "DWORD (32-bit) Value".
- Type "ScanWithAntiVirus" as the value name, and then press Enter.
- Right-click the new "ScanWithAntiVirus" DWORD value, and then click "Modify".
- In the "Value data" box, type 1, and then click OK.

- Exit the Registry Editor.
- Restart your computer, and then log back into Windows to have the registry change take effect!
The download error(s) should be now resolved in both Google Chrome and Microsft Edge!
Jon Pienkowski
Pacific Northwest Computers
www.pnwcomputers.com
www.linktr.ee/pnwcomputers
360-624-7379
Monday, May 30, 2022
Windows Security Center Stops Working - Windows 11
I have run into a problem repeatedly recently. On a client computer running Windows 11, if I go to open the Windows Security Center, it won't open and I will get the following message/error:
Some websites will recommend the following:
"Go to the Settings. Select App > Apps & features and type in ‘security’ in search menu box. An icon for Windows Security will pop open. From there, click on the options (three dots) and select Advanced options. Now scroll down to Reset section and click on Reset.
You’ll get a confirmation asking if you really want to reset the app, along with your whole app data. Click on Reset to go with it."
However, so far what I have found is that "Windows Security" is not in the application list at all!
So how can I reset the app?
Well, what I have found was a simple command you can run from the Windows PowerShell (with administrative privileges) that ultimately solved the problem for me, as well as for some of my clients who have run into this same issue as well.
- Using Windows' search, just type in "PowerShell"

- Right-click on its icon, and select "Run as Administrator"
- Next, copy and paste (or type in) the following script:
Get-AppxPackage Microsoft.SecHealthUI -AllUsers | Reset-AppxPackage
- Hit Enter, and you should get a screen like this:

That should do the trick!
Your Windows Security Center should now be working again!
Pacific NW Computers
www.pnwcomputers.com
360.624.7379
Monday, March 7, 2022
Ransomware Infection? This could help!!
Ransomware infections are a very real and very serious problem that general computer users, and businesses alike, should be prepared for!
- First off, the best prevention to start with is to have good security software installed that can protect you from Ransomware infections (such as Malwarebytes Anti-malware, Kaspersky Antivirus, etc).
- Secondly, have a good data backup system in place that follows the 3-2-1 backup rule to keep your data safe!
- The 3-2-1 backup rule simply states that you should have:
- 3 copies of your data (your main data and 2 backup copies)
- On two different media types (NAS drive and a thumb drive)
- With one copy off-site for disaster recovery (cloud backup, etc).
If you do get hit with a ransomware infection, the website below can help you identify which ransomware you were infected with and if there is a de-encryption tool available to help get your data/files back: https://id-ransomware.malwarehunterteam.com/
Simple Automatic Backup
If your laptop has an SD card slot and you don't have a data backup system in place, you can use an SD card to set up an automatic backup of your Windows computer!
No clunky external hard drive is needed if you aren't storing a ton of stuff!
- Snag a compatible 128, 256, or 512GB Class 10 U3 V30 or better SD card off of Amazon
- Pop that little chip into the card reader slot on your laptop.
- Open up the "Backup and Restore (Windows 7)" system utility from the Windows Control Panel.
- Select the installed SD card as your backup destination and continue with, and complete, the backup configuration!
- Then just leave the SD card plugged in, and the computer will automatically backup to the installed SD as scheduled!
That's it! 🙌
Easy peasy, lemon squeezy; your data is now automatically backed up!
Monday, February 28, 2022
Upgrade your Windows 10 PC to Windows 11 NOW!
No need to wait for the Windows Update to come along... You can download and install Windows 11 RIGHT NOW!
All you have to do is use Microsoft's Windows 11 Installation Assistant, and you can upgrade your computer today!You need to make sure your system is compatible and meets the minimum system requirements for Windows 11. You can check your computer's compatibility by using Microsoft's PC Health Check application!
Windows 11 System Requirements:
- Processor 1 gigahertz (GHz) or faster with 2 or more cores on a compatible 64-bit processor or System on a Chip (SoC).
- RAM Minimum of 4 gigabyte (GB).
- Storage: 64 GB or larger storage device.
- System firmware UEFI, Secure Boot capable. Check here for information on how your PC might be able to meet this requirement.
- TPM Trusted Platform Module (TPM) version 2.0. Check here for instructions on how your PC might be enabled to meet this requirement.
- Graphics card Compatible with DirectX 12 or later with WDDM 2.0 driver.
- Display High definition (720p) display that is greater than 9” diagonally, 8 bits per color channel.
Monday, March 12, 2018
Run macOS in Windows via Virtual Machine!
With a few downloads, a hand full of steps to follow, you can have a Virtual Apple computer running on your Windows PC. That's right! Your eyes are not deceiving you. You can create a macOS virtual machine using VMware Workstation Player! Have access to the apps, tools, programs that you love about your Apple computer, all on your Windows PC!! No "hackintosh" required.
The link for the tutorial is below and will require you to download and install several programs as well as modify a config file using NotePad. Nothing crazy, but there are quiet a few steps involved. So read carefully and pay close attention to each step.
Link: Run macOS High Sierra OSX via Virtual Machine on a Windows PC!
- VMware Virtual Workstation Player us up to version 14. However the needed "unlocker" utility that makes VMware Workstation Player compatible with OSX is ONLY compatible with copies of Version 12 VMware Virtual Workstation Player. So DO NOT download the newest version of VMware Virtual Workstation Player; only use copies of version 12.
- You DO NOT need an ISO or currently OSX installation media. The tutorial has a link to have to download the Intel version of the Mac OSX virtual machine. This virtual machine is provided courtesy of the excellent fellows at Techsvidrewer.
Thank you PCSteps.com for creating such an easy to follow and thorough setup/install guide!!
Pacific Northwest Computers
www.pnwcomputers.com
Thursday, September 8, 2016
Winning Against Windows 10: Fight Microsoft and Win!
As well all know from either the news, friends, family, or even personal experience, Windows was tricky with this OS upgrade and many people were automatically upgraded without direct and clear consent or without any knowledge until it was too late. If they did agree, some users had major issues with system stability, hardware, and software following the upgrade to Windows 10. Not the smooth process Microsoft said it to was to be... This means repair costs for folks as well as the inconvenience of downtown, as well as lost work and income for business.
Well recently I had a customer whose business computer went down due to a non-user initiated Windows 10 upgrade. The upgrade actually didn't complete correctly, killing the Windows OS upgrade installation (mid-install) requiring the system to be brought into the shop, have Windows 7 re-installed and onsite service to get everything set back up again. Well my client did some research and found a ebook on Amazon called "Winning against Windows 10".
"Winning against Windows 10" is the story of a woman named Teri Goldstein and specifically lays out how Teri fought back against Microsoft (due to a Windows 10 upgrade that messed up her system) and she actually was able to win; forcing Microsoft to reimburse her $10,000!!
Using the book (which gives you the specifics on her court case), my client was able to fight back against Microsoft themselves and was able to get Microsoft to reimburse them for all of the repair costs; onsites and all!
So if you have had any issues with Windows 10 "damaging" your computer and you had to get it fixed and/or can prove lost income from downtime, etc you could get Microsoft to pay you back!!
www.pnwcomputers.com
Wednesday, April 30, 2014
Microsoft Internet Explorer Vulnerability ~ Fact and Opinion
As you have most likely heard, Microsoft is scrambling to fix a major bug which allows hackers to exploit flaws in Internet Explorer 6, 7, 8, 9, 10 and 11. The company has also confirmed it will not issue a fix for web browsers running on Windows XP after it formally ended support for the 13 year old operating system back on April 8th.
The vulnerability was discovered by cyber security software maker FireEye Inc. which stated the flaw is a ‘zero-day’ threat. This means the first attacks were made on the vulnerability before Microsoft was aware of it. FireEye also revealed a sophisticated hacker group has already been exploiting the flaw in a campaign dubbed ‘Operation Clandestine Fox’, which targets US military and financial institutions.
FireEye spokesman Vitor De Souza declined to name the hackers or potential victims as the investigation is ongoing, only telling Reuters: “It’s unclear what the motives of this attack group are at this point. It appears to be broad-spectrum intel gathering.”
For its part Microsoft has confirmed the existence of the flaw in an official post: https://technet.microsoft.com/library/security/2963983
Now, Internet Explorer has always been a vulnerable browser and has exploits created/identified against it everyday. This is why for YEARS I have pushed my customers to use an alternative Web Browser such as Mozilla Firefox or Google Chrome. As previously mentioned, both of those web browsers are safer to use than Internet Explorer and are both immune from the recently identified exploit!
What makes this recent vulnerability stand out from the others, and why this particular vulnerability is making all the headlines, is that the problem is pretty widespread; affecting 1 in 4 Windows based computers and ALL Windows XP systems.
A Temporary Fix
While Microsoft rushes to fix the bug, FireEye gave concerned users two workarounds .
- Use another web browser other than Internet Explorer
- Disable Adobe Flash. “The attack will not work without Adobe Flash,” it said. “Disabling the Flash plugin within IE will prevent the exploit from functioning.”
No Hope For Windows XP
Microsoft has confirmed that no fix will be rolled out for Windows XP because support has officially ended and there are no plans to make an exception. It states:
“An unsupported version of Windows will no longer receive software updates from Windows Update. These include security updates that can help protect your PC from harmful viruses, spyware, and other malicious software, which can steal your personal information.”
The company’s advice to Windows XP users has remained the same for some time: upgrade to Windows 7 or 8 or buy a new PC. It has also repeatedly sent a pop-up dialog box to reachable Windows XP machines with the following end of support notification.
For users unsure whether their existing XP PCs can support Windows 8, Microsoft offers a software tool called ‘Windows Upgrade Assistant’ which can be downloaded here: http://go.microsoft.com/fwlink/p/?LinkId=321548
If you have any questions or concerns please don't hesitate to get in touch!
Jon Pienkowski
Pacific NorthWest Computers
www.pnwcomputers.com
360-624-7379
Wednesday, April 4, 2012
Top 5 Myths Computer Repair Customers Believe About “Going Apple”
There seems to be a perceived consensus among a segment of my customer base that believes going Mac would solve all their ills, save them money, and provide numerous other benefits. While there are situations where Macs are justified, the steamrolling in the media by the Apple-centric movement to iEverything helps fuel a majority of this misconception surrounding the Apple brand...
.jpg)
.jpg)
.jpeg)


