How to Create a Local Account When Setting up a NEW Windows 11 Computer
We figured out a way to create a local account on Windows 11 when you are installing a fresh OS or setting up a new system! With this trick, you can steer clear of the Microsoft account requirement for Windows 11!
The easiest way to set up Windows without a Microsoft account is using a "dummy account" that was set up for this exact purpose. You don’t need to open Command Prompt, run commands, or disable the internet connection here. It’s a tried-and-tested method, and it just works without any fuss.
Here’s how to go about it:
- First, connect to the Wi-Fi and proceed with the Windows setup as normal. If you have a wired Ethernet connection, keep it connected.
- When you reach the Microsoft sign-in screen, enter a@a.com under the email field and click on “Next”. Do not worry, it’s a locked dummy account used for bypassing the Microsoft account requirement.
- On the next page, enter any password you like just to complete the steps.
- Now, click on “Sign in“.
- Since it’s a locked account, Microsoft will straight away start setting up a local account for you. You will see an “Oops, something went wrong” error, and then you can create a local account on Windows 11. Simply click on “Next”.
- Now you can now use Windows 11 without logging into a Microsoft account!
*UPDATE* 4-24-2024
The method listed above has been proving more and more ineffective in bypassing the mandatory requirement to set up a new Windows 11 computer, with a Microsoft account. But there's a simple trick for setting up a local account that involves issuing a command to keep Windows from requiring the Internet to install/set up and then cutting off the Internet at just the right time in the setup process. This works the same way whether you are doing a clean install of Windows 11 or following the OOBE process on a store-bought computer.
1. Follow the Windows 11 install process/setup process until you get to the "choose a country" screen:
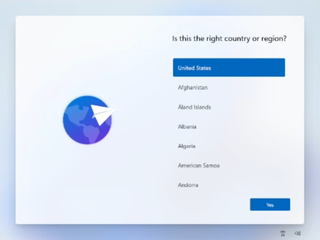
(Image credit: Tom's Hardware)
*Now's the time to cut off the Internet. However, before you do, you need to issue a command that prevents Windows 11 from forcing you to have an Internet connection.
2. Hit Shift + F10. A command prompt appears.
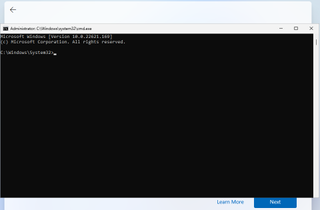
(Image credit: Future)
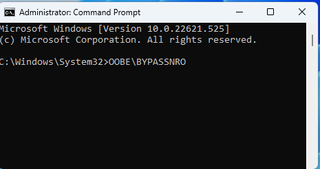
3. Type OOBE\BYPASSNRO to disable the Internet connection requirement.
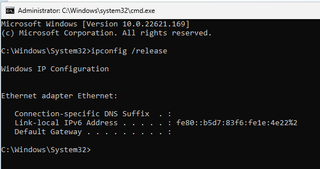
*The computer will reboot and return you to this screen.
4. Hit Shift + F10 again and this time Type ipconfig /release. Then hit Enter to disable the Internet. Alternatively you could also simply unplug the network cable if that's at all possible.
(Image credit: Tom's Hardware)
5. Close the command prompt.
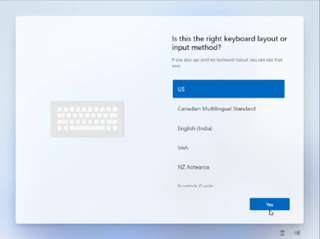
6. Continue with the installation, choosing the region. keyboard and second keyboard option.
5. Close the command prompt.
6. Continue with the installation, choosing the region. keyboard and second keyboard option.
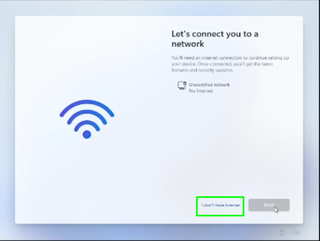
*A screen saying "Let's connect you to a network" appears, warning you that you need the Internet.
7. Click "I don't have Internet" to continue.
(Image credit: Tom's Hardware)
8. Click Continue with limited setup.

(Image credit: Tom's Hardware)
9. Enter a username you want to use for your local account and click Next.
8. Click Continue with limited setup.
(Image credit: Tom's Hardware)
A new login screen appears asking "Who's going to use this device?"
9. Enter a username you want to use for your local account and click Next.
