Thursday, August 11, 2022

Guerilla SEO


Guerilla SEO

Step 1:

Have a website made, or build a website for your company.
For its ease of use and simplicity, we use and recommend Weebly for easily building and maintaining a website inexpensively.

Step 2:

Get your business signed-up and set up with “the big guys”:

Step 3:

Create a business page, and/or account, with all of the major Social networks. Be sure to Include ALL of your important business information; including your logo, address, phone number, email, website, etc.

Step 4:

Once you have all of your social media accounts set up, go through the “Free Web Business Listings” list below and set up a business listing through EACH service. Include ALL of your important business information; including address, phone number, email, website, social media accounts, etc.

Step 5:

Create a free Linktr.ee webpage for ALL of the different web links you now have! You can list your main web page, blogs, social media accounts, payment services, etc.

*Extra:

If you would like to accept ANY form of payment from your customers (besides check, cash and credit cards) sign up with the following payment services as well:

Tips, Tricks, and Recommendations:

  1. Purchase your website domain for 2 years or more when signing up or renewing. Renewing your website for just 1 year can make your page appear “temporary” to search engine bots.
  2. If search engine bots come across your website information in different places across the internet, your website will start to rank higher in search results organically due to your site’s “perceived” importance.
  3. I recommend using Instagram as the main “Hub” for the bulk of your social media posts. With Instagram, you can connect your Facebook, Twitter, and Tumblr accounts to share whatever you post on Instagram, to those other social networking platforms as well! From there you can share that same post to other social media platforms by just copying and pasting the post.
  4. Use hashtags in your social media posts to have your posts listed in those associated hashtag categories.
  5. Go through your website page by page, and make sure that certain “keywords”, that you want to be found with, are used at least 4 times on the associated webpage.
  6. When posting to social media, use your main website address AS WELL as your Linktr.ee address.

Free Web Business Listings:

A website with a * indicates that either the website is having issues, or the website might be a "paid for" service and may not actually be free.

Jon Pienkowski
Pacific Northwest Computers
www.pnwcomputers.com
www.linktr.ee/pnwcomputers

Tuesday, August 9, 2022

Get your Business Listed Online for FREE!


Want more people to be able to find your business online?
Use this list of websites to get your business listed for FREE!

By listing your company on the various websites listed below, you will help potential customers find you no matter the service or platform they are using! Additionally, having your company information and website information listed around the internet also makes your website look "more important" to search engine crawlers! Which in turn, could improve your web search rankings! Pacific Northwest Computers offers this as a service to our customers as well! So feel free to get in touch with Pacific Northwest Computers if you would like some help getting this all set up for you! 

Jon Pienkowski
Pacific Northwest Computers
360.624.7379

Monday, May 30, 2022

Windows Security Center Stops Working - Windows 11

I have run into a problem repeatedly recently. On a client computer running Windows 11, if I go to open the Windows Security Center, it won't open and I will get the following message/error:

Some websites will recommend the following:

"Go to the Settings. Select App > Apps & features and type in ‘security’ in search menu box. An icon for Windows Security will pop open. From there, click on the options (three dots) and select Advanced options. Now scroll down to Reset section and click on Reset.

You’ll get a confirmation asking if you really want to reset the app, along with your whole app data. Click on Reset to go with it."

However, so far what I have found is that "Windows Security" is not in the application list at all! 

So how can I reset the app?

Well, what I have found was a simple command you can run from the Windows PowerShell (with administrative privileges) that ultimately solved the problem for me, as well as for some of my clients who have run into this same issue as well.

  • Using Windows' search, just type in "PowerShell"


  • Right-click on its icon, and select "Run as Administrator"
  • Next, copy and paste (or type in) the following script:

Get-AppxPackage Microsoft.SecHealthUI -AllUsers | Reset-AppxPackage

  • Hit Enter, and you should get a screen like this:


That should do the trick!
Your Windows Security Center should now be working again!

Pacific NW Computers
www.pnwcomputers.com
360.624.7379

Thursday, April 28, 2022

M.2 SSD Not Detected by Windows 11/10 Installer

If you experience that the Windows installer cannot find your M.2/NVMe drives when installing Windows 11/10, try this process of loading the Intel IRST driver to gain access to your SSD drive!


For the Intel CPU platform, you need to manually install Intel Rapid Storage Technology (IRST) driver during the Windows installation process. You can also refer to the Intel document of How to Configure RAID or Intel Optane Memory with Intel RST on an Intel VMD Capable Platform.
Note: The following pictures are a reference, it may be varied depending on the different versions.


Manually install Intel Rapid Storage Technology (IRST) driver

  • Download Intel Rapid Storage Technology (IRST) driver Download Link.
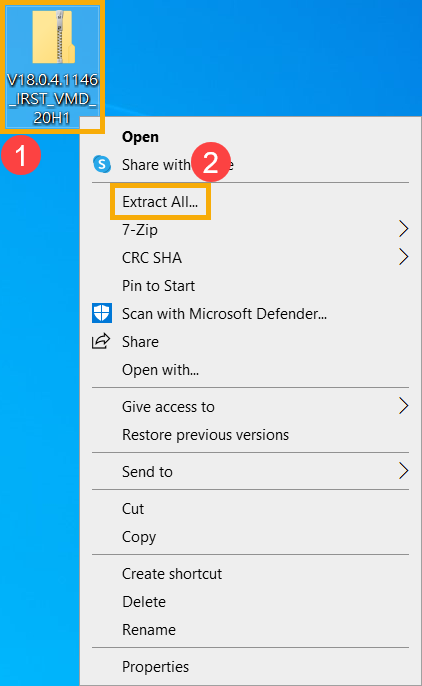
  • After downloading the driver, right-click [V18.0.4.1146_IRST_VMD_20H1] compressed file① and select [Extract All]②.
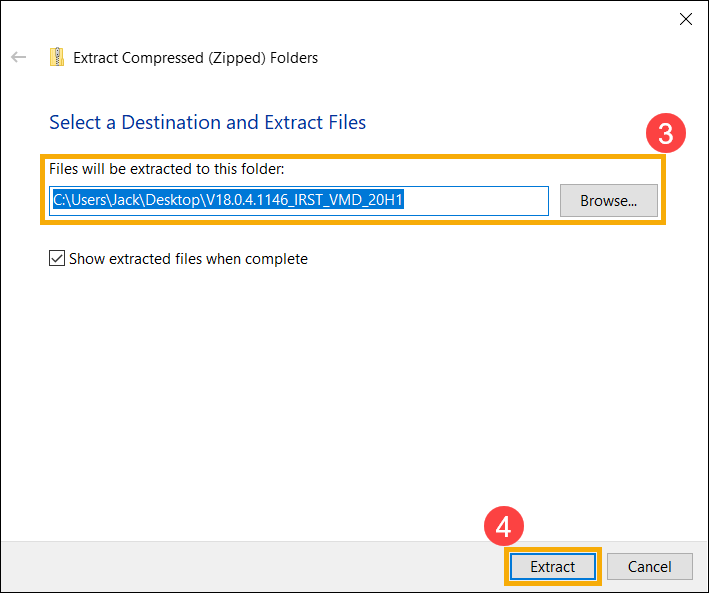
  • Select a Destination③ (such as a USB thumb drive) and click [Extract]④.

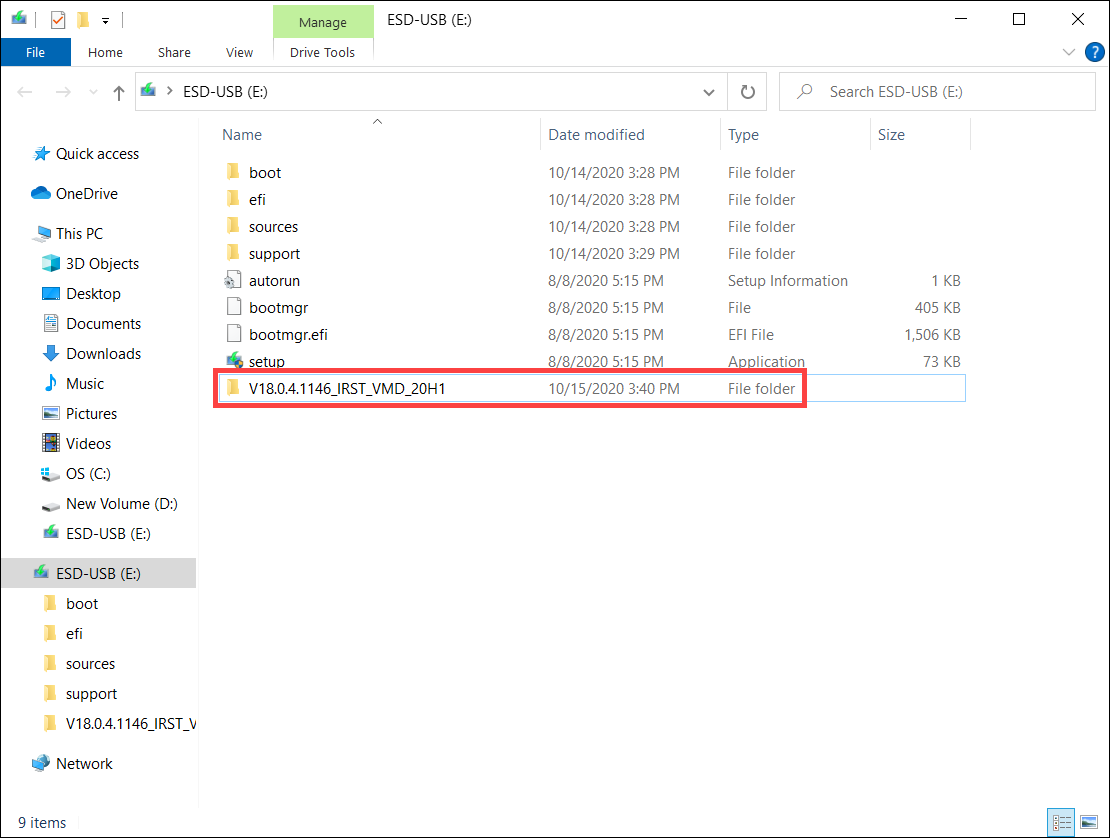
  • After the extraction is completed, please copy the entire folder (V18.0.4.1146_IRST_VMD_20H1) to a USB flash drive.
  • If you used a USB flash drive to create the Windows 11/10 installation media as well, please copy the entire folder to the same USB flash drive which is created as the Windows 11/10 installation media.

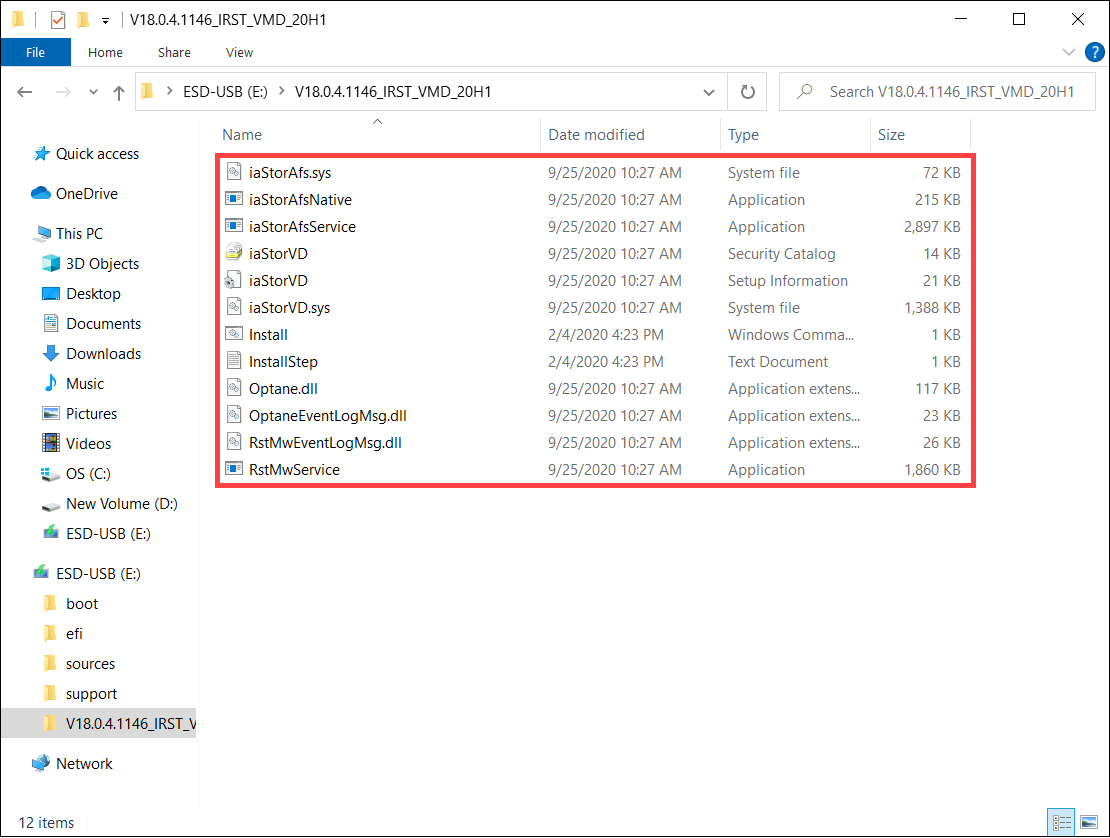
  • After the copying is completed, make sure the folder includes the following files.

Install Intel Rapid Storage Technology (IRST) driver

  • Connect the USB flash drive which includes the Windows 11/10 installation media and Intel Rapid Storage Technology (IRST) driver (V18.0.4.1146_IRST_VMD_20H1 folder) to the target computer. (If you used a DVD to install Windows 11/10, please insert the DVD and consist of the above files USB flash drive to the target computer together.)
  • Restart the Windows 11/10 installation process, here you can learn more about How to use installation media to insatll Windows 11/10.
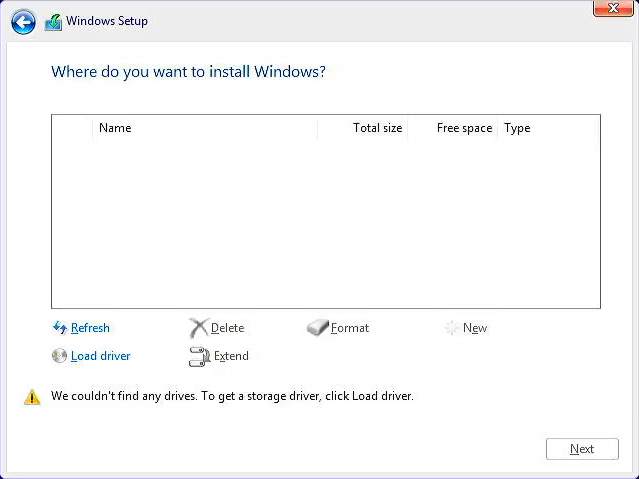
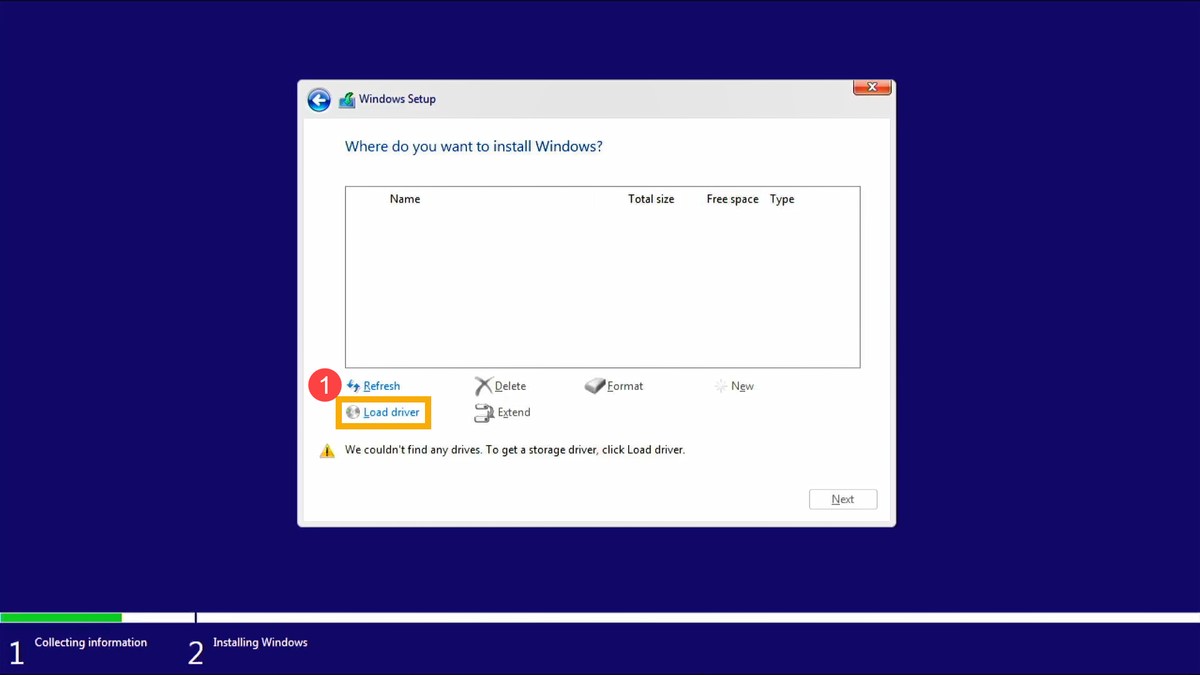
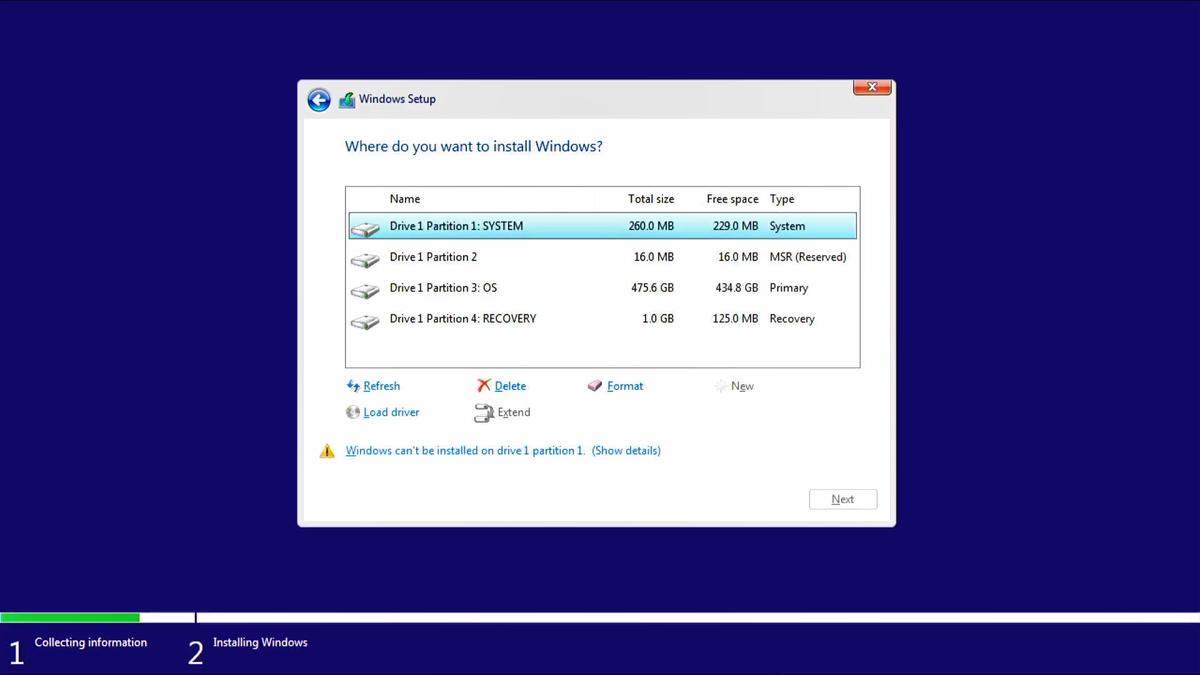
  • On the screen of Where do you want to install Windows and Windows cannot find any drives, please select [Load driver]①.

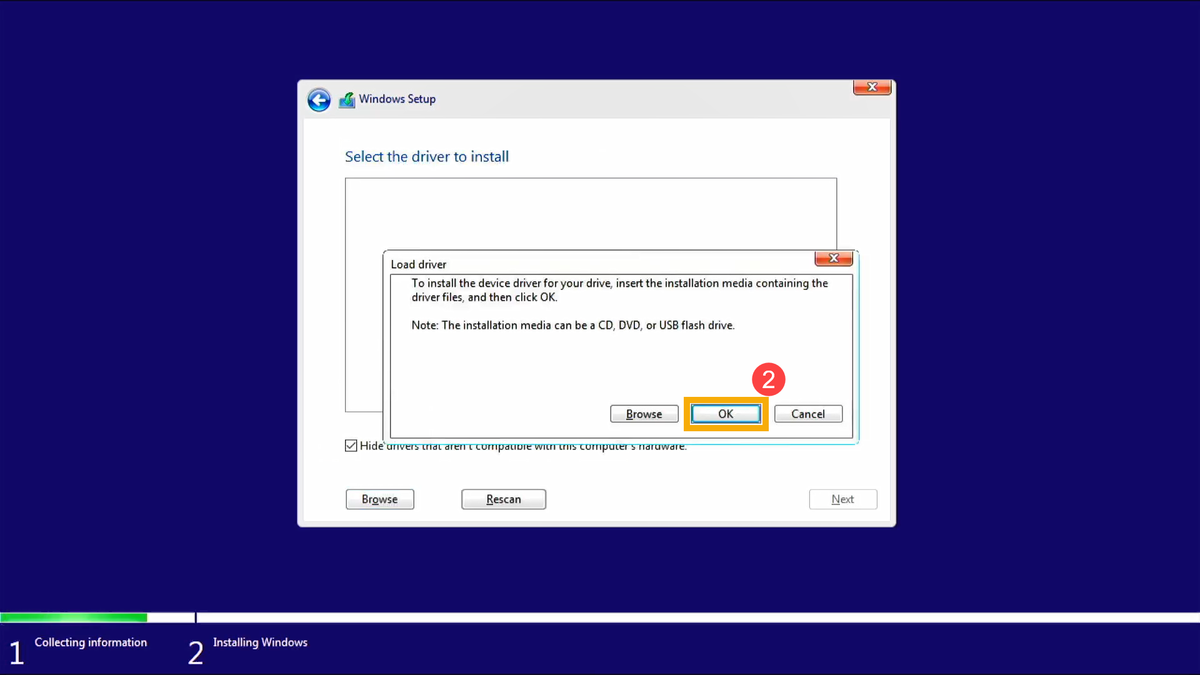
  • Select [OK]②.

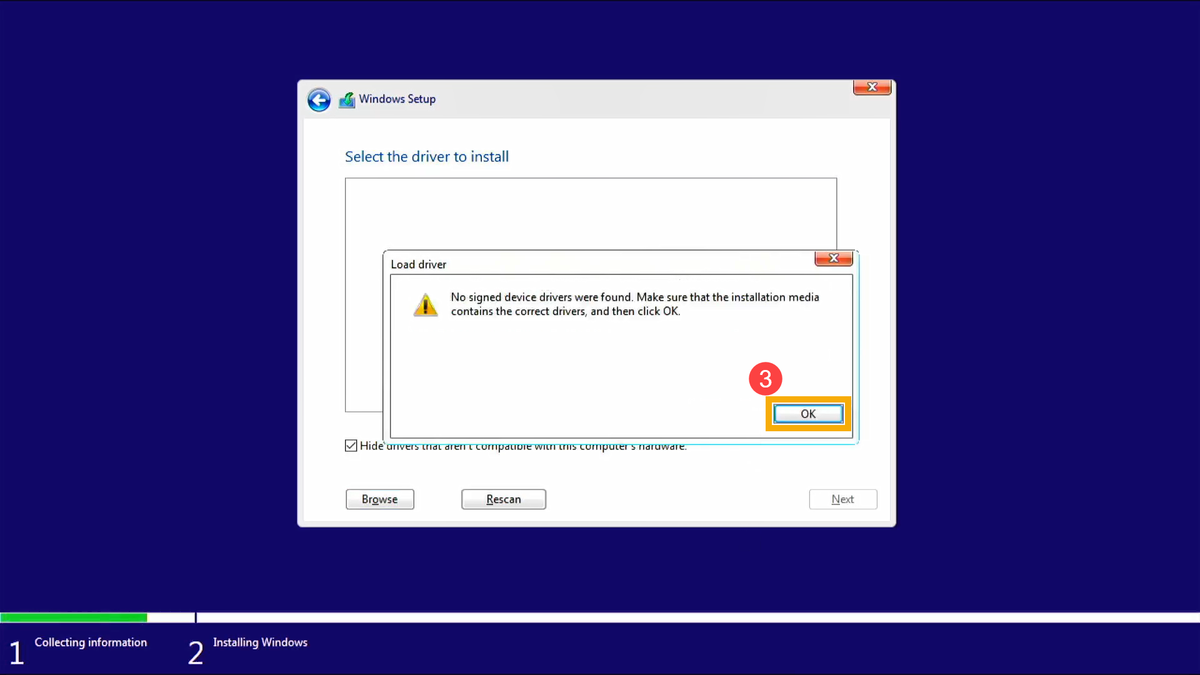
  • Click [OK]③.

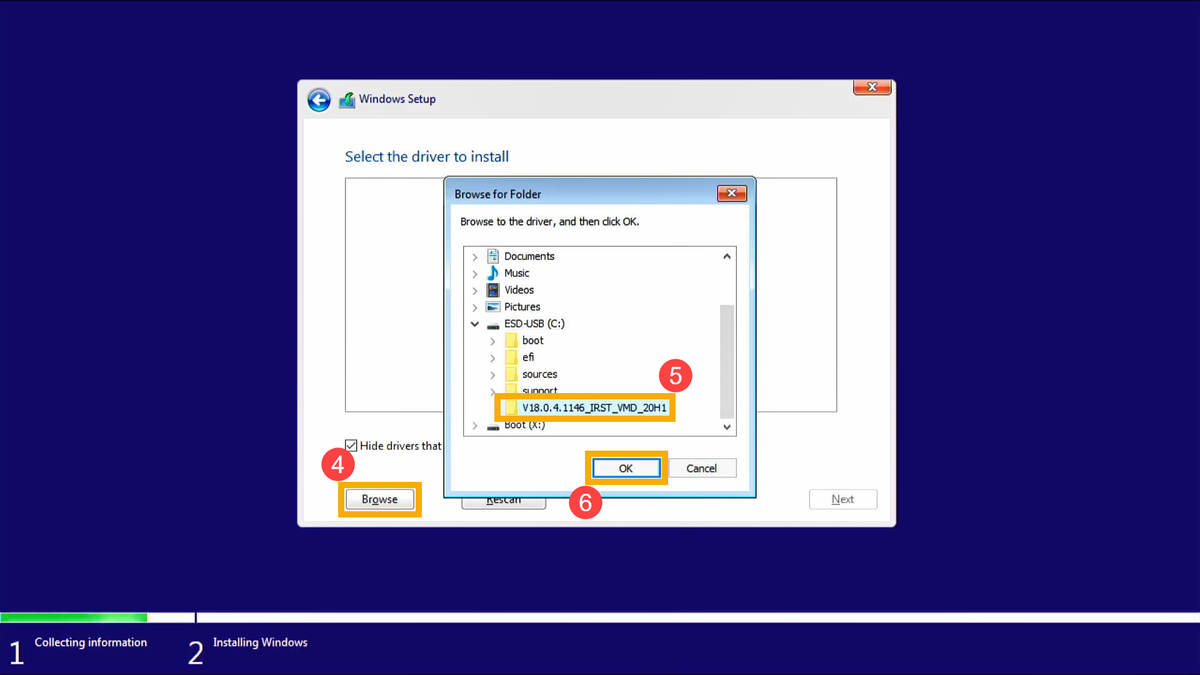
  • Select [Browse]④, then find the [V18.0.4.1146_IRST_VMD_20H1] folder⑤ and select [OK]⑥.

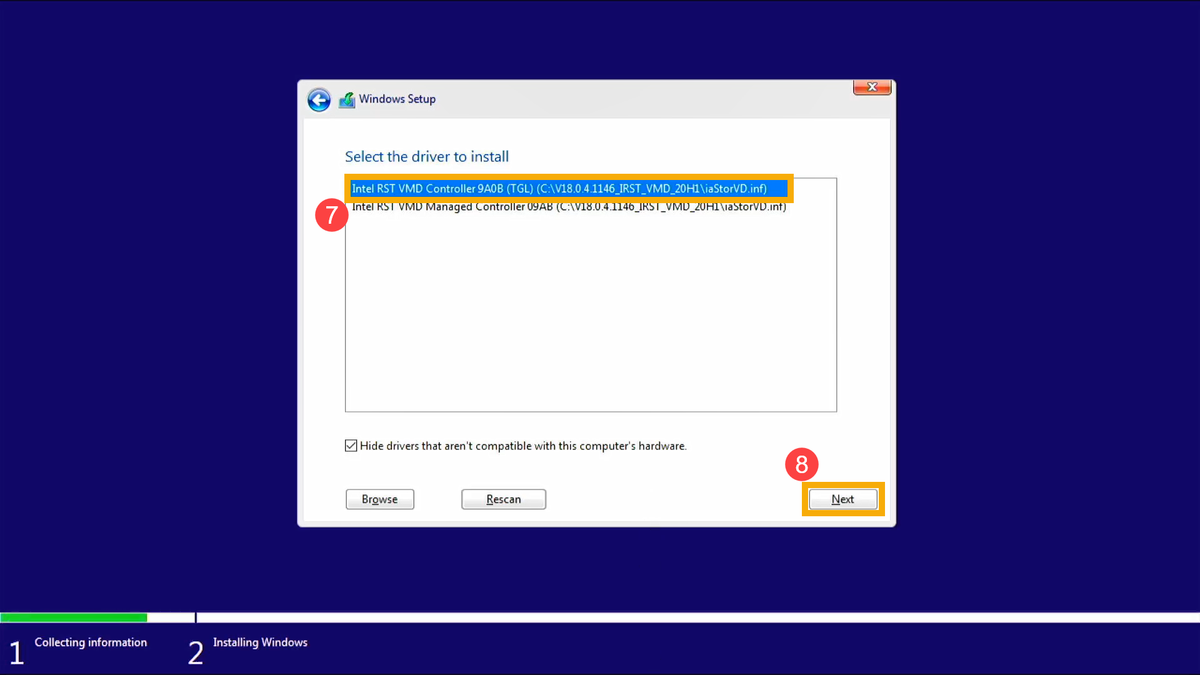
  • Select [Intel RST VMD Controller 9A08 (TGL) ]⑦, then select [Next]⑧ to install the driver.

  • After the driver installation is completed, the drives will appear normally.

That's it!

The Windows installer should now see your M.2/NVMe drive!


Original Article:
https://www.asus.com/support/faq/1044458

Thursday, March 17, 2022

PC, Mac and Linux Disk and Hard Drive Recovery


R-STUDIO

Mac, Linux & PC Disk Recovery,
and Hard Drive Recovery Tool!

Have you accidentally deleted some data?
Is your hard drive all of a sudden not letting you access the drive? 
Does your computer say that it needs to "format the drive" before it can be used?
Does it seem like your hard drive maybe has died?!
Well, R-Studio Recovery software from R-Rools might be your saving grace!

Empowered by the new unique data recovery technologies, R-STUDIO is the most comprehensive data recovery solution for recovery files from NTFS, NTFS5, ReFS, FAT12/16/32, exFAT, HFS/HFS+ and APFS (Macintosh), Little and Big Endian variants of UFS1/UFS2 (FreeBSD/OpenBSD/NetBSD/Solaris) and Ext2/Ext3/Ext4 FS (Linux) partitions. It also uses raw file recovery (scan for known file types) for heavily damaged or unknown file systems. It functions on local and network disks, even if such partitions are formatted, damaged, or deleted. Flexible parameter settings give you absolute control over data recovery.

www.r-studio.com

Monday, March 7, 2022

Ransomware Infection? This could help!!


Ransomware infections are a very real and very serious problem that general computer users, and businesses alike, should be prepared for!

  • First off, the best prevention to start with is to have good security software installed that can protect you from Ransomware infections (such as Malwarebytes Anti-malware, Kaspersky Antivirus, etc).
  • Secondly, have a good data backup system in place that follows the 3-2-1 backup rule to keep your data safe! 
    • The 3-2-1 backup rule simply states that you should have:
      • 3 copies of your data (your main data and 2 backup copies)
      • On two different media types (NAS drive and a thumb drive)
      • With one copy off-site for disaster recovery (cloud backup, etc).

If you do get hit with a ransomware infection, the website below can help you identify which ransomware you were infected with and if there is a de-encryption tool available to help get your data/files back: https://id-ransomware.malwarehunterteam.com/


Pacific NW Computers
www.pnwcomputers.com
360.624.7379

Simple Automatic Backup

Quick Computer/Laptop Tip:

If your laptop has an SD card slot and you don't have a data backup system in place, you can use an SD card to set up an automatic backup of your Windows computer!
No clunky external hard drive is needed if you aren't storing a ton of stuff! 

  • Snag a compatible 128, 256, or 512GB Class 10 U3 V30 or better SD card off of Amazon
  • Pop that little chip into the card reader slot on your laptop.
  • Open up the "Backup and Restore (Windows 7)" system utility from the Windows Control Panel. 
  • Select the installed SD card as your backup destination and continue with, and complete, the backup configuration! 
  • Then just leave the SD card plugged in, and the computer will automatically backup to the installed SD as scheduled!

That's it! 🙌
Easy peasy, lemon squeezy; your data is now automatically backed up! 

Pacific NW Computers
www.pnwcomputers.com
360.624.7379

Monday, February 28, 2022

Upgrade your Windows 10 PC to Windows 11 NOW!

No need to wait for the Windows Update to come along... You can download and install Windows 11 RIGHT NOW!

All you have to do is use Microsoft's Windows 11 Installation Assistant, and you can upgrade your computer today!

You need to make sure your system is compatible and meets the minimum system requirements for Windows 11. You can check your computer's compatibility by using Microsoft's PC Health Check application!

Windows 11 System Requirements:

  • Processor 1 gigahertz (GHz) or faster with 2 or more cores on a compatible 64-bit processor or System on a Chip (SoC).
  • RAM Minimum of 4 gigabyte (GB).
  • Storage: 64 GB or larger storage device.
  • System firmware UEFI, Secure Boot capable. Check here for information on how your PC might be able to meet this requirement.
  • TPM Trusted Platform Module (TPM) version 2.0. Check here for instructions on how your PC might be enabled to meet this requirement.
  • Graphics card Compatible with DirectX 12 or later with WDDM 2.0 driver.
  • Display High definition (720p) display that is greater than 9” diagonally, 8 bits per color channel.

Monday, February 21, 2022

How to Dispose of Batteries

How to Dispose of Batteries

Batteries power a variety of portable devices. Everything from cordless phones and laptops to cars and toys use battery power. Eventually, a battery stops powering a device or fails to charge. That means it’s time to replace it!
Knowing how to dispose of batteries properly helps protect the environment. Whether they're rechargeable AA batteries or single-use alkaline batteries, learn safe disposal. This guide offers tips on battery disposal and battery recycling.

Single-Use vs. Rechargeable Batteries

  • There are two basic types of batteries in use: rechargeable and single-use or disposable ones.
  • Rechargeable batteries can be charged many times before they're replaced. They're found in cordless phones, smartphones, and digital cameras. Power tools and similar devices that drain energy quickly use them too.
  • Single-use batteries are found in alarm clocks, remotes, and other gadgets. They're designed to be used as long as the cell makes electricity.

Can Batteries Be Thrown Out?

  • Batteries contain chemicals and metals that produce a reaction to generate electrical energy. While the recycling of batteries is encouraged to protect the environment, you can throw out some types. Common household alkaline batteries are considered non-hazardous. You may toss out alkaline batteries with ordinary trash.
  • Button cell batteries used in items like remote car starters and watches contain silver and mercury. They must be recycled. In California, all household batteries are categorized as hazardous waste. Batteries must be brought to a household hazardous waste disposal facility. Another option is recycling at an authorized recycling facility in the state.

How to Dispose of Alkaline Batteries

  • Alkaline batteries include AA, AAA, 9 volt and D cells. Small batteries may run remote controls or flashlights. Larger batteries power smoke detectors, clocks and wireless consumer devices. Even when the cells no longer run devices, the batteries can still produce current. They can be hazardous if discarded improperly. Take these precautions before throwing them out:
  • Collect used household batteries in a container. A cardboard box or plastic tub is a safe option.
  • Prevent any fire risk by taping 9-volt battery terminals before tossing.

How to Dispose of Rechargeable Batteries

  • The types of rechargeable batteries in use include lithium-ion and nickel-cadmium. Other types are nickel-metal hydride, nickel-zinc, and small sealed lead batteries. The toxic metals that generate energy in these batteries can hurt the environment if discarded incorrectly.
  • Rechargeable 9-volt batteries, AA and AAA batteries, and D cells for household use look like alkaline batteries. The difference is they fit compatible plug-in chargers. Rechargeable batteries are recycled. Look for the battery recycling seals on rechargeable batteries.

Tip: Remove batteries from broken cordless phones, smartphones, and laptops. They'll be ready whether you give away, throw away or recycle the device.


Where to Recycle Batteries

Recycling companies dispose of the components of rechargeable batteries responsibly and properly. The metals and chemicals don’t end up in streams and landfills. Here are some options for recycling:

  • Call2Recycle, is a nonprofit battery recycling program. Rechargeable batteries can be dropped off in Call2Recycle bins at partnered store locations. Any rechargeable battery that weighs up to 11 pounds and is under 300-watt hours is accepted. There's no charge for recycling.
  • Many local solid waste districts host collection events for residents to drop off batteries.
  • Some battery manufacturers and recycling facilities have mail-in programs. Before mailing batteries, be sure to follow postal shipping precautions.
  • Most auto care retailers accept car batteries for recycling.

Common types of recyclable batteries:

  • Lithium-Ion (L-Ion) battery: These batteries are often used in personal electronics such as smartphones. They also run laptop computers, tablets and cordless power tools.
  • Nickel Cadmium (Ni-Cd) Batteries: These rechargeable cells are used in power tools and communication devices. They're for devices that require high current draw but aren't in constant use.
  • Nickel Metal Hydride (Ni-MH) battery: These rechargable batteries come in AA, AAA, 9 volt and D cells. They're used in digital cameras and other devices that drain power quickly.
  • Small Sealed Lead Acid (SLA) Battery: These rechargeable batteries are often used in large items like motor vehicles and lawn mowers. They're also power medical devices and telecommunications.

Practice the proper disposal of used batteries. Knowing how to correctly discard household and rechargeable batteries helps the environment!!


Wednesday, February 16, 2022

Mac Battery/Power Management System Calibration

Calibrating The Battery/Power Management System of a Mac Is Easy To Do!

On a new Apple computer, or after a new battery is installed...

Step 1 – Charge The Battery To 100%

  • Shut down the computer and then connect the power adapter.
  • Keep the computer plugged in until the light on the power connector turns green indicating a 100% charge.

Step 2 – Charge Two More Hours

  • After the battery is 100% charged, keep the power adapter plugged into the computer for an additional 2+ hours. 
  • The computer can be powered up and used during this time.

Step 3 – Temporarily Change the Energy Saver Settings

  • If the computer is off, you'll need to turn it on.
  • In OS X System Preferences click on the Energy Saver preferences.
  • In the Energy Saver / Battery preferences:
    • Set the "Turn display off after:" slider to "Never"
  • Various Mac models may have two sliders for "computer sleep" and "display sleep". If you have two sliders, simply slide both to the right to set them to "Never"
    • UNCHECK "Put hard disks to sleep when possible"
    • UNCHECK "Slightly dim the display while on battery power"
      • Note: The location/existence of certain settings may shift or vary depending on your computer model or OS version.
  • In the Energy Saver / Power Adapter preferences:
    • Set the "Turn display off after:" slider to "Never"
    • Various Mac models may have two sliders for "computer sleep" and "display sleep". If you have two sliders, simply slide both to the right to set them to "Never"
    • CHECK "Prevent computer from sleeping automatically when the display is off"
    • Note: this setting may or may not be available depending on your model or OS version.
    • UNCHECK "Put hard disks to sleep when possible"
      • Note: The location/existence of certain settings may shift or vary depending on your computer model or OS version.

Step 5 – Unplug And Drain The Battery

  • Unplug the power adapter.
  • Leave the computer on until it automatically shuts down.
  • You can use the computer during this step, but don't put the computer through heavy use to deplete the battery faster. Steady, even usage is better for power system calibration.

Step 6 – Leave It Off And Unplugged

  • After the computer has automatically shut down, leave it shut down for at least 5 hours or overnight. 
  • This will ensure the battery is completely drained of energy.

Step 7 – Charge To 100% Again

  • Plug the computer back in until the battery is 100% charged.
  • While plugged in, the computer can be used.
  • This is also a good time to go back and select your desired Energy Saver preferences.

AND THAT'S IT!

After this essential calibration, the new battery will be able to achieve its fullest charge and reach its full lifespan, and the system will display an accurate battery level. You can also reuse these steps to recalibrate the power management system every few months if desired.