Thursday, June 8, 2023

Gigabyte Motherboard BIOS Restore/Repair

Gigabyte Motherboard BIOS Restore/Repair

If your Gigabyte Motherboard BIOS becomes corrupt or damaged, and the board has a "Dual BIOS", you can use one of the methods below to restore/switch from your damaged/corrupted BIOS over to the other/working BIOS.


Method 1:

  1. Shut off your computer
  2. Hold the power button until your computer starts and shuts down again
  3. Press the power button again, your backup BIOS might now be loaded and the system may POST.

Method 2:

  1. Shut off your computer
  2. Hold power AND the reset button for about 10 sec, then release.
  3. If this method works, your system will now boot into the backup BIOS now.

Method 3:

Only use this method if nothing else has worked!!! You could potentially permanently damage your motherboard when attempting this last method!
  1. Make sure you have a speaker built into your motherboard, or you have one attached to your motherboard's front panel connection header.
  2. You can short out pins 1 and 6 on the main BIOS chip by attaching a jumper to both pins (Pin #1 of the chip should be marked with a dot).
  3. As you short the pins, press the power button while you are still holding the jumper on the pins. You might want to have a friend help with this process so you don't accidentally short any other pins on the BIOS chip.
  4. Remove the jumper you're holding between pins 1 and 6 when you hear the POST beep.
  5. The backup BIOS should now be loaded and the system should POST.

Once you get the system up and running again, re-flash the other BIOS so you have yet another, alternative working BIOS.


Jon Pienkowski
Pacific NW Computers
360.624.7379

Thursday, May 4, 2023

Microsoft Word/Microsoft Office: Turn off Entire Word Automatic Selection

How To Turn off Automatic Word Selection In Microsoft Office; Microsoft Word, Outlook, etc.

  1. Open Word, Excel, etc.
  2. Go to File, Options, then Advanced.
  3. Look for the option, "When selecting, automatically select the entire word" (it is enabled by default).
  4. You disable the 'feature' by deselecting its checkbox.
  5. Now Office will not automatically select the entire word when trying to select specific text!

Jon Pienkowski
Pacific NW Computers
360.624.7379

Wednesday, April 19, 2023

How to Create a Local Account When Setting up a NEW Windows 11 Computer

How to Create a Local Account When Setting up a NEW Windows 11 Computer


We figured out a way to create a local account on Windows 11 when you are installing a fresh OS or setting up a new system! With this trick, you can steer clear of the Microsoft account requirement for Windows 11!

The easiest way to set up Windows without a Microsoft account is using a "dummy account" that was set up for this exact purpose. You don’t need to open Command Prompt, run commands, or disable the internet connection here. It’s a tried-and-tested method, and it just works without any fuss.

The easiest way to set up Windows without a Microsoft account is using a "dummy account" that was set up for this exact purpose. You don’t need to open Command Prompt, run commands, or disable the internet connection here. It’s a tried-and-tested method, and it just works without any fuss.

Here’s how to go about it:

  1. First, connect to the Wi-Fi and proceed with the Windows setup as normal. If you have a wired Ethernet connection, keep it connected.
  2. When you reach the Microsoft sign-in screen, enter a@a.com under the email field and click on “Next”. Do not worry, it’s a locked dummy account used for bypassing the Microsoft account requirement.
  3. On the next page, enter any password you like just to complete the steps. 
  4. Now, click on “Sign in“.
  5. Since it’s a locked account, Microsoft will straight away start setting up a local account for you. You will see an “Oops, something went wrong” error, and then you can create a local account on Windows 11. Simply click on “Next”.
  6. Now you can now use Windows 11 without logging into a Microsoft account!

*UPDATE* 4-24-2024

The method listed above has been proving more and more ineffective in bypassing the mandatory requirement to set up a new Windows 11 computer, with a Microsoft account. But there's a simple trick for setting up a local account that involves issuing a command to keep Windows from requiring the Internet to install/set up and then cutting off the Internet at just the right time in the setup process. This works the same way whether you are doing a clean install of Windows 11 or following the OOBE process on a store-bought computer.


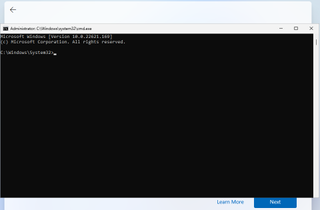
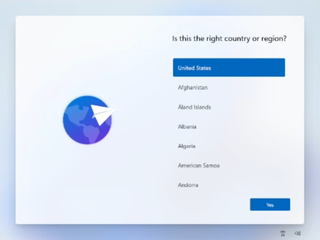
1. Follow the Windows 11 install process/setup process until you get to the "choose a country" screen:


(Image credit: Tom's Hardware)

*Now's the time to cut off the Internet. However, before you do, you need to issue a command that prevents Windows 11 from forcing you to have an Internet connection.


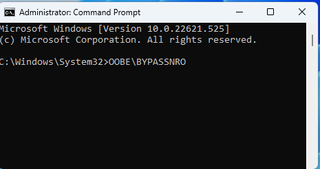
2. Hit Shift + F10. A command prompt appears.
(Image credit: Future)

3. Type OOBE\BYPASSNRO to disable the Internet connection requirement.

*The computer will reboot and return you to this screen.


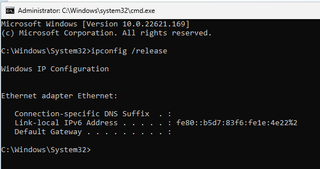
4. Hit Shift + F10 again and this time Type ipconfig /release. Then hit Enter to disable the Internet. Alternatively you could also simply unplug the network cable if that's at all possible.

(Image credit: Tom's Hardware)

5. Close the command prompt.

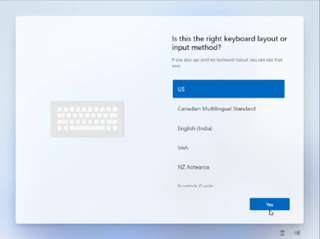
6. Continue with the installation, choosing the region. keyboard and second keyboard option.

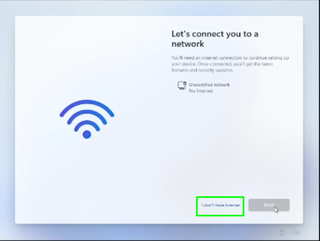
*A screen saying "Let's connect you to a network" appears, warning you that you need the Internet.


7. Click "I don't have Internet" to continue.
(Image credit: Tom's Hardware)

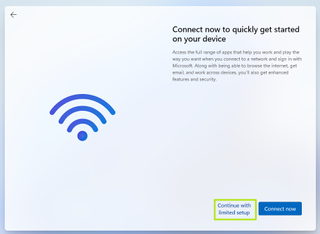
8. Click Continue with limited setup.

(Image credit: Tom's Hardware)

A new login screen appears asking "Who's going to use this device?"


9. Enter a username you want to use for your local account and click Next.

You are now setting up a local user account to be used, instead of being associated with a Microsoft Account!


Jon Pienkowski
Pacific NW Computers
360.624.7379

Wednesday, April 12, 2023

Create a Content Marketing Strategy for Your Business

Create a Content Marketing Strategy for Your Business

Did you know that content marketing generates three times more leads than traditional marketing and costs 62% less? Content marketing is a powerful way to attract, engage, and delight your target audience and turn them into loyal customers. But how do you create a content marketing strategy that works for your business? In this blog post, we’ll show you the steps to follow and the tools to use to create a successful content marketing strategy.

What is Content Marketing?

Content marketing is the process of creating and distributing valuable, relevant, and consistent content to attract and retain a clearly defined audience and ultimately drive profitable customer action. Content marketing can include blog posts, ebooks, videos, podcasts, infographics, webinars, case studies, newsletters, social media posts, and more. The goal is to provide useful information to your audience that helps them solve their problems or achieve their goals.

Why Do You Need a Content Marketing Strategy?

A content marketing strategy is a plan that outlines your goals, your audience, your content topics, your content formats, your content channels, your content calendar, and your content metrics. A content marketing strategy helps you:
  • Define your purpose and value proposition. 
    • Why are you creating content and what value do you offer to your audience?
  • Identify and understand your target audience. 
    • Who are they, what are their needs and challenges, and what are their preferences and behaviors?
  • Create relevant and engaging content. 
    • What topics will you cover, what formats will you use, and what tone and style will you adopt?
  • Distribute and promote your content. 
    • Where will you publish and share your content, and how will you reach and attract your audience?
  • Measure and optimize your content. 
    • How will you track and analyze your content performance, what metrics will you use, and how will you improve your results?

How to Create a Content Marketing Strategy in 5 Steps

Creating a content marketing strategy may seem daunting, but it doesn’t have to be. Here are five simple steps to follow:

1) Set Your Goals

The first step is to define what you want to achieve with your content marketing. Your goals should be specific, measurable, achievable, relevant, and time-bound (SMART). For example:
  • Increase website traffic by 50% in six months
  • Generate 100 new leads per month from ebooks
  • Boost email open rate by 10% in three months
  • Grow social media followers by 20% in one year
Your goals should also align with your overall business objectives and support your customer journey.

2) Know Your Audience

The second step is to identify and understand who you are creating content for. You need to know who they are, what they want, what they need, what they care about, what they struggle with, and how they consume content. You can use tools such as buyer personas and customer journey maps to create detailed profiles of your ideal customers and map out their stages of awareness, consideration, and decision.

3) Choose Your Content Topics

The third step is to decide what topics you will cover in your content. You need to choose topics that are relevant to your audience’s needs and interests, as well as to your business goals and value proposition. You can use tools such as keyword research, competitor analysis, social media listening, surveys, and analytics to find out what topics are popular, trending, or in demand among your audience.

4) Choose Your Content Format(s)

The fourth step is to determine what formats you will use for your content. You need to choose formats that suit your topics, your goals, and your audience’s preferences. You can use tools such as Google Analytics, social media insights, email reports, and feedback forms to find out what formats perform best for your content. Some of the most common formats are:
  • Blog posts: These are articles that provide information, tips, advice, opinions, or stories on a specific topic. They can help you drive traffic, generate leads, build authority, and educate your audience.
  • Ebooks: These are long-form documents that offer in-depth knowledge, guidance, or solutions on a specific topic. They can help you generate leads, nurture prospects, showcase expertise, and establish trust.
  • Videos: These are visual and audio recordings that demonstrate, explain, entertain, or inspire on a specific topic. They can help you increase engagement, boost awareness, build loyalty, and influence decisions.
  • Podcasts: These are audio recordings that discuss, interview, teach, or share a specific topic. They can help you reach new audiences, create relationships, grow followers, and enhance credibility.
  • Infographics: These are graphical representations that summarize, visualize, or compare data or information on a specific topic.


Jon Pienkowski
Pacific NW Computers
360.624.7379

Social Media Marketing: How To Get Started (Work In Progress)

Marketing/Social Media Marketing 101 (BASICS)

The goal of consistent social media postings is for potential customers to be able to find your content and thusly find the product/service that you are providing. Experimenting with hashtags, keywords, posting in social media groups, and a sub-Reddit, helps people find you when looking up related topics and interests!

Also, people like to see the behind-the-scenes of how stuff is made, produced, designed, and tested. Social media can give your customers (current and potential) a glimpse into what you're doing, how you make your product, and how your provided service is helping a customer. Social media can allow you to show people a more intimate and transparent look into what you do. That simple appreciation could turn into future business! If they see how dedicated you are, or they like your process and are impressed with how you do what you do, that all can generate business!

Plus it gives content for clients to be able to share with their friends! They see a post about something you've done, it reminds them of what you did for them, and they share that post with their friends/community!

FIRST THINGS FIRST: Have The Basics Covered

  • Have professional artwork and/or logos made, along with a professional headshot if needed.
  • Have a GOOD website. In this day in age, if your product doesn't have a good website, it can be the first impression a customer gets for your company. So you don't want "Just a website". Have a well-done website made for your product/service/company.
    • Have a good first-page landing page
    • Make sure to have an easy-to-find/get to About Us, Contact Form & Social Media links
  • Have marketing material, business cards, a .Dot business card, etc ready to go.
  • Try and have a few online payment methods set up so you can get paid no matter what:
    • Venmo
    • PayPal
    • CashApp
    • Square
    • Stripe

Figure Out Your Target Audience

Age, Economic Status, Geographic location, Interests, Hobbies, etc.
But don't just think about the general public! Also, think about businesses that may be interested as well. Coffee shops, wineries, government entities, corporate/commercial clients, etc.
You obviously want to try to sell to the general public, but maybe consider businesses-to-business opportunities, consider local/state/federal government agencies, big corporations, etc.

HAVE GOOD Contact Info on ALL SITES/PLATFORMS

  • Web Site Address
  • Phone Number(s)
  • Email Addresses
  • Messaging Services like Telegram, WhatsApp, etc.
  • A Linktr.ee Address
    • This is VERY handy! You can list ALL of your website links under one, easy to remember Linktr.ee address!

Social Media for Pictures and Information

  • Facebook
  • Instagram
Use the MOBILE apps of each platform for the best posting experience. You can't do everything you can on Instagram then you can on its mobile device. Facebook, Linkedin, and Twitter are different. But Tiktok, Instagram, and Snapchat are designed for mobile users and simple web access.

By using Instagram you can actually also share your post directly to Facebook, Tumblr, and Twitter at the same time! The Instagram app allows you to share posts to multiple platforms!

Social Media for Video

  • Tiktok
  • Snapchat
  • Youtube
  • Twitch
For quick video content, you can also take advantage of Instagram Reels, Facebook Stories, YouTube Stories as well as TikTok, and Snapchat. These "quick video" media outlets are VERY popular right now and another way to be found in certain trends, hashtags, etc. The same hashtag principles that work for general posts on social media, also work for video-based social media services.

Streaming can also be an effective way to find/gain new customers! If you are interested in live streaming what you do, what you sell, what you make/create, etc, Twitch, Youtube Live, Instagram Live, Facebook Live, and TikTok Live, are GREAT outlets for live streaming media.

Research Trends

  • Etsy
  • Reddit
  • Pinterest
This can be VERY helpful in your posts getting traction and popularity. If you see that Earth Day is trending? Do an Earth Day post. Is it "National Nurses Day"? Do a nursing-related post. 
This can work with Political topics, pop culture trends, etc. Knowing what's popular, and what people are following; that information can be priceless when strategizing what to post online!

Hashtags and Keywords

Search hashtags and certain keywords or interests/topics to see what hashtags and keywords are over-saturated, or topics that have little to no interactions. It is always worth a try to tag a post with a keyword with 17 million viewers, but your post will likely get lost in the sea of posts.
So try to find hashtags, keywords, groups, etc that have a good amount of followers but if you use a hashtag with 1 Billion followers, it could get "lost at sea".
Also by experimenting with different hashtags and keywords, etc you will also narrow down what works and what does not work.
When you find keywords, hashtags, etc that work for you, THEN you can use that information to start doing paid advertising

Research hashtags, keywords, interests, groups, subreddits, trending topics, etc to find your "Niche" markets to start your marking plan. This will evolve over time as you look for what works best for you and the posts you make.

Look up and try out different hashtags in your posts to see what kind of response you get from your posts. Don't go too crazy with the hashtags in your posts, however. I usually limit the number of hashtags that I use to 10 at MAX. I recommend using around 8.

Ideas On What To Post (Video, Text, or Picture):

  • ALWAYS USE RESEARCHED HASHTAGS; ON ANY/ALL POSTS!
  • Current world events
  • Trending pop culture topics
  • Behind the scenes of your product, service, etc.
  • Highlight a product or service that you provide
  • Your product or service in action!
  • Giving back to the community? Post about it!
  • Give free tips, give tutorials and how-to's, make product or service recommendations, etc. Anything that might be helpful but also related to your industry
  • Highlight other local businesses that you like/use; maybe even cross-promote!
  • Are you having a sale, running a special, or have an event coming up? Post about it!

Advertising/Paid Advertising

Once you have played around with keywords, hashtags, interests groups, etc you can take ALL of the information you have gained from your social media response on your posts, you can use that information to start doing targeted advertising.

Posting Tips:

  • Don't expect one single post to hit a home run! I usually use the psychology rule that if you see something 3 times (and even better, seeing something 3 times on 3 different platforms) will help people to be more likely to remember your post. But if they see the same thing on different platforms, it can give it more legitimacy and importance.
  • I always recommend posting specific hashtags for 3-4 weeks at a time to see what the ACTUAL response to your posts is from those hashtags.
  • When you post, try to post quality pictures! Don't go overboard with filters and edits, provide good contact information in ALL of your posts, make sure to use good grammar and punctuation, etc.
  • The Instagram mobile app can post to Facebook, Instagram, Twitter, and Tumblr. You don't need to use all of those services, but at least get used to using posting to Instagram and Facebook, using the Instagram mobile app.
  • Facebook groups, Reddit subreddits, etc can be good communities to interact with the community and be able to passively advertise yourself. Don't just join a group and start blasting what you do/sell! Interact with posts and if asked, or if it's brought up, or the timing seems right, refer nonchalantly to your business!

Jon Pienkowski
Pacific NW Computers
360.624.7379

Friday, April 7, 2023

Test Your Laptop Battery (Windows 10, Windows 11)

Easily test your Windows 10 or Windows 11 laptop's battery with a simple command using the built-in Microsoft Windows Powershell!

  1. Open the Windows PowerShell by right-clicking on the Start menu icon and selecting "Windows PowerShell (Admin)" from the menu that appears.
    • A pop-up window may ask for permission to make changes to your device; say yes.
  2. The blue PowerShell command window will appear. 
  3. In the window that opens up, enter:
    powercfg /batteryreport /output "C:\battery-report.html"
  4. Press Enter to run the command.
  5. PowerShell will then tell you the name of the generated battery life report HTML file and where it has been saved on your computer. 
    • It should be located at the root of your C:\ drive.
  6. You can now close the PowerShell window.
  7. Next, open File Explorer and access the C: drive. 
  8. There, you should find the battery life report saved as an HTML file called, "battery-report.html"
  9. Double-click the file to open it in your default web browser.
  10. In the report, find the Design Capacity and Full Charge Capacity of your laptop's battery.
  11. Now, using a calculator on your phone or your computer, divide the Full Charge Capacity by the Design Capacity amounts.
  12. If the result on your calculator is 0.80 or less, it may be time to replace your battery!

Epson Eco Tank Ink Fill

Epson EcoTank printers are great! The ink comes in bottles instead of cartridges, the ink doesn't dry up anywhere as easily, and the ink lasts foreeevvveeerr!! 

But what happens when you have to fill one (or more) of the ink tanks, but your printer still says you are out of ink/or your ink is still low?

Well, there happens to be a built-in feature that allows you to notify your Epson EcoTank printer that you have filled your ink! Here's how you can do it:

  1. Press the "Home" button on the Epson printer's main display panel.
  2. Using the arrow pad, "<-- OK -->" (Left, Right, Up, and Down arrows with an OK selection key), you want to scroll until you get to the "Settings" option.
  3. In "Settings", you want to select "Maintenance" which is typically the first tab/page.
  4. In the "Maintenance" menu, you want to scroll to and select "Fill Ink"
  5. Next, you will be asked to select which ink tanks you have recently filled, and then you will be asked to confirm that they were in fact filled.
  6. That's it!

Your ink level/status on the Printer as well as the Status Monitor software installed on your computer (if you have it installed) should now show your Printer's ink as being full! 

That's it!

Jon Pienkowski
Pacific NW Computers

Wednesday, April 5, 2023

Xfinity, Comcast, Comcast Business Modem Port Forwarding

 Xfinity, Comcast & Comcast Business 
Modem Port Forwarding

  1. Login to your Xfinity/Comcast Modem by entering one of the two following IP addresses into a browser address bar:
    1. 10.0.0.1 for residential customers.
    2. 10.1.10.1 for Comcast Business customers.

  2. The default logins for most Comcast/Xfinity modems are:
    1. Username: cusadmin Password: highspeed
    2. Username: admin Password: password

  3. After you log in, if you are asked to change the default password, do so! That way no random people can try to gain access to your modem if they gain access to your wifi/network. Use a safe/secure password and make a note of that information for future use.

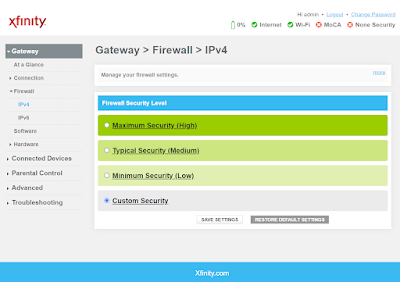
  4. First off, you want to configure the Firewall in your modem to either be set to Custom or if you can, turn it off completely if possible.

  5. After turning off the Firewall, go to "Connected Devices".

  6. Reserve the IP address (set a static IP) for the device that you are port forwarding to.

  7. Click on the "Advanced" tab, and you can then set up any/all port forwarding rules as needed to your statically assigned device!
Xfinity/Residential Modem Firewall:

Comcast Business Modem Firewall:

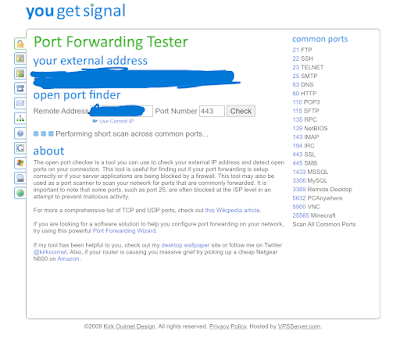
  • To make sure you have in fact opened the needed ports successfully, you first need to figure out your public IP address. You can visit www.whatismyip.com and get your Public IP address.
  • Next, visit www.yougetsignal.com's Open Port testing site and make sure the ports you have opened/forwarded are indeed working!

Friday, March 3, 2023

Windows 11 Local Security Authority Protection Is Off & Won't Turn Back On!?


If you have a Windows 11 computer and find that your Local Security Authority protection is turned off, and Windows won't turn it back on, no matter how many times you restart the system. There is a simple registry edit you can make to get things working again!

Hold down the Windows key on your keyboard + R at the same time, this brings up the Run dialog box. Type regedit and hit enter to bring up the registry editor. 

Inside the registry editor, in the list on the left side, navigate to:
HKEY_LOCAL_MACHINE\SYSTEM\CurrentControlSet\Control\Lsa

Once there, right-click anywhere on the list on the right side to bring up the context menu. Select New>DWORD (32-bit). Make sure you don't click QWORD (64-bit) by accident. If you're seeing a list that says "Modify" and some other options, left-click anywhere on the white space in the list to deselect whatever is selected there and right-click again.

Now name the new entry "RunAsPPLBoot", then right-click the "RunAsPPLBoot" entry and click Modify. The "Value" box should already be highlighted, enter 2 and click OK. Close the registry editor without modifying anything else, and restart your computer.

Monday, February 20, 2023

Apple ID; Can't Sign-In On Older Devices

Have you ever gotten an older Apple device (iPad, iPod, etc) and when you tried to set it up, and try to log in with your Apple ID information, you get an error message along the lines of; "This Apple ID cannot be used on this device. This Apple ID can only be used with devices running iOS version 15 or newer."

Turns out your Apple ID account has a "Recovery contact" setup/associated with your account just in case you ever get locked out. Well, that feature is unfortunately a modern iOS feature, and if enabled you will get the previous error when you try to sign in to an old Apple device with that associated Apple ID!

So what is the fix?

Remove the recovery contact(s) from your account! That's it!
Once you do that, you will then be able to login to older Apple devices using your Apple ID information.


Pacific Northwest Computers
360.624.7379