Convert an existing Windows 10 Installation from Legacy BIOS to UEFI
One of the critical system requirements for Windows 11 is having a GPT partition scheme for installation, which must be based on UEFI. This article explains how to convert existing Windows 10 Installation from the Legacy MBR partition scheme to the more modern GPT UEFI partition scheme, using Microsoft's MBR2GPT.exe tool; all without losing any data or settings!Convert MBR to GPT Without Data Loss
Windows has an in-built tool, called MBR2GPT which can help to convert a Legacy Windows 10 Installation(also called MBR), to modern UEFI, based on a GPT partition scheme. There are multiple steps involved in the process and some pre-requisites, discussed below:Pre-requisites:
- The MBR disk must have at most 3-partitions.
- The OS must be 64-bit.
- Bitlocker or encryption must be turned off.
- There should be an Operating system on the disk.
- One of the partitions must be active (typically the system partition; you confirm that from disk Management).
- No dual boot is currently being used.
- Windows 10 version must be at least version 1703.
How MBR2GPT works.
MBR2GPT tool works by first validating the disk. An EFI system partition is created if the disk is validated and UEFI boot files are installed. After that, layout and Boot configuration data are updated, matching with the new values.Step 1: Boot to the Recovery environment
- To boot to WinRE, from where Windows can trigger the MBR2GPT tool, please see the steps below:
- On the Lock screen, press and hold the Shift key while choosing Restart from the Power menu. Continue pressing the shift key until you see the Windows Recovery environment, asking you to select an option.
- Click Troubleshoot>Advanced options>Command Prompt.
- The computer will restart.
- Login to your account.

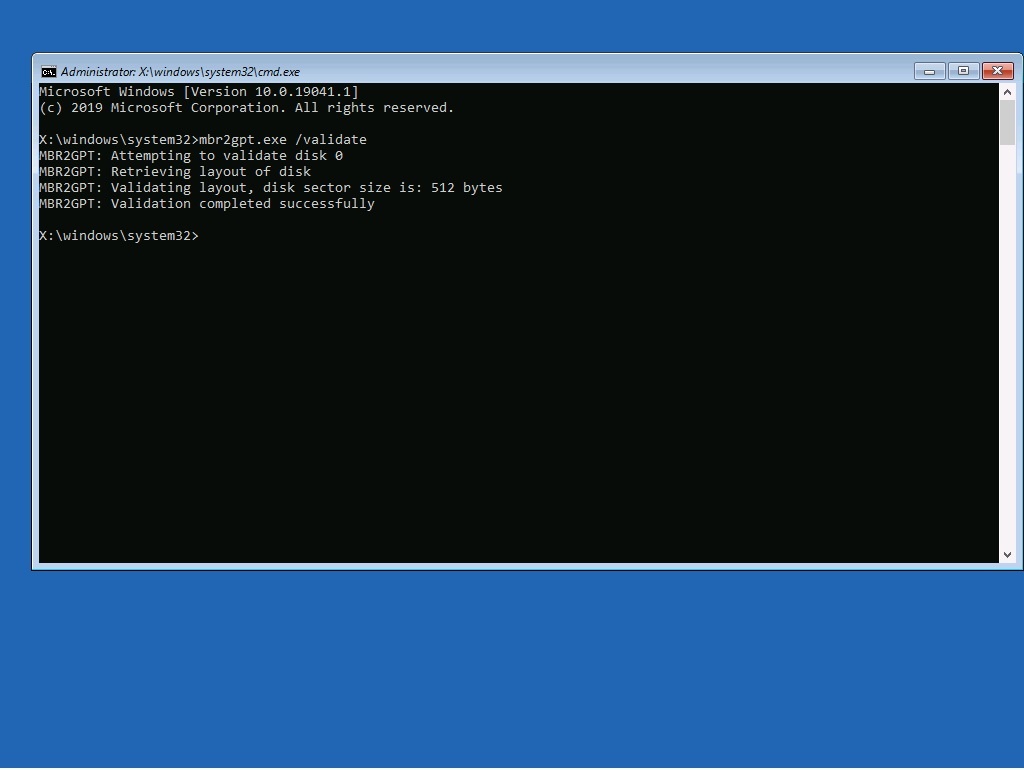
Step 2: Validate if the MBR2GPT tool can convert your disk
- On the Command Prompt Window, our next step would be to check if the tool can convert the disk to GPT. To do this, execute the following command:
mbr2gpt.exe /disk:0 /validate
*You may need to use 'diskpart' to identify the disk number of the drive your Windows Installation is on. - The output should tell you if the validation is successful. If the disk is validated, conversion is possible.
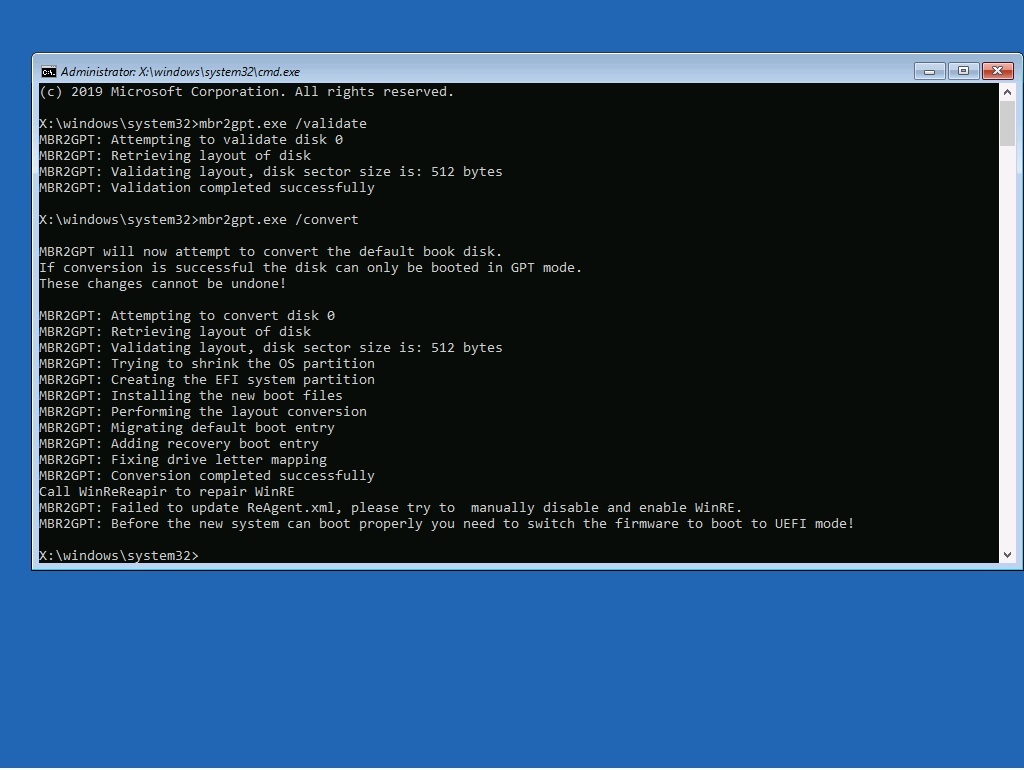
Step 3: Convert the disk.
- The next step is to convert the disk. For that, use the /convert switch.
mbr2gpt.exe /disk:0 /convert - The process would take some minutes and tell you the output.
Step 4: Change Motherboard/BIOS Settings & Boot Order
Now to boot from the newly converted GPT drive, the settings in the BIOS/Motherboard firmware need to have a few things changed. Boot to the PC's Motherboard BIOS settings, and make sure of the following settings changes:- Boot method: UEFI from Legacy
- CSM: Disabled
- Secure Boot: ON
- TPM: Enabled
- Edit the boot order, so the boot order shows 'UEFI: Windows Boot Manager' at the top
- Save the changes and exit the BIOS
The device should now have a UEFI boot method with a GPT disk layout and should be ready to boot via UEFI now!!
Troubleshooting
If the MBR2GPT tool is failing to convert your installation, here are some steps you can try.- Make sure the existing MBR disk has only three partitions or less: If the qualifying hard disk has more than three partitions, this tool would not work. To confirm the number of partitions, you can invoke the disk management tool from the Start menu. The three-count includes System partitions as well. If that is the case, decrease partitions using the Disk Management tool by merging and try again.
- Run a disk check: If there is corruption on the disk, the tool may fail. To fix this, run a full disk check, preferably from the Recovery environment. See the steps here.
- Try running from a USB Installation media: Another option to invoke the MBR2GPT tool from a USB Installation media. After the computer has booted from the Installation media, click Repair your computer>Troubleshoot>Command Prompt.
- Return codes: If the conversion failed, the tool would return a code, which would tell you what went wrong.
- Investigate Log files: If nothing has helped, it may be wise to look at the logs to see what went wrong. By default, the MBR2GPT tool creates Setupact.log and Setuperr.log in the C:/Windows directory, which records the process. Setuperr.log contains all the errors encountered during the conversion, which may give a hint. In addition, /logs switch can also redirect logging to a custom path if you need, like for an external drive which helps investigate later. The command for logging to a custom path would be like this(replace D:\Work with your desired path). mbr2gpt.exe /convert /logs:D:\Work
- If nothing has helped, perform a clean installation of Windows 10 using the GPT partition scheme. You must back up the data before, as a clean install would remove everything. As the Media Creation tool makes the media according to the existing method, which is likely MBR, use Rufus to create Installation media and choose GPT partition scheme for UEFI. My colleague Shawn has a good tutorial on this on Tenforums.
Appendix 1:
Return Code / Details0 = Conversion completed successfully.
1 = User canceled.
2 = Internal error occurred.
3 = Disk initialization error.
4 = Command-Line parameters were incorrect.
5 = MBR2GPT could not read the disk layout.
6 = One of the volumes was encrypted on the disk.
7 = The disk does not meet the requirements.
8 = EFI Partition could not be created.
9 = Error installing boot files.
10 = Error while applying GPT layout.
Resources:
- MBR2GPT - Windows Deployment | Microsoft Docs
- Also Check:Check Windows 11 compatibility using these tools - Your Windows Guide
- Create a Windows 11 USB Flash drive - Your Windows Guide
- Clean Install Windows 11 - Your Windows Guide
- How to: Troubleshoot Windows 11 upgrade and Installation errors - Microsoft Community
Original Article:
https://answers.microsoft.com/en-us/windows/forum/all/convert-an-existing-windows-10-installation-from/aa8c2de3-460b-4a8c-b30b-641405f800d7
Original Article Written By:
Sumit D - VM
Article Author

No comments:
Post a Comment